Set Your Appointments with Calendar for Xamarin Forms

In this blog post, we will guide you through adding the appointments in your xamarin forms application. We need to add a Calendar component in the application to set the appointment and in order to do that, we will use a package called Xamarin.Plugin. Calendar created by Josip Caleta.
Setting up a Solution for Application
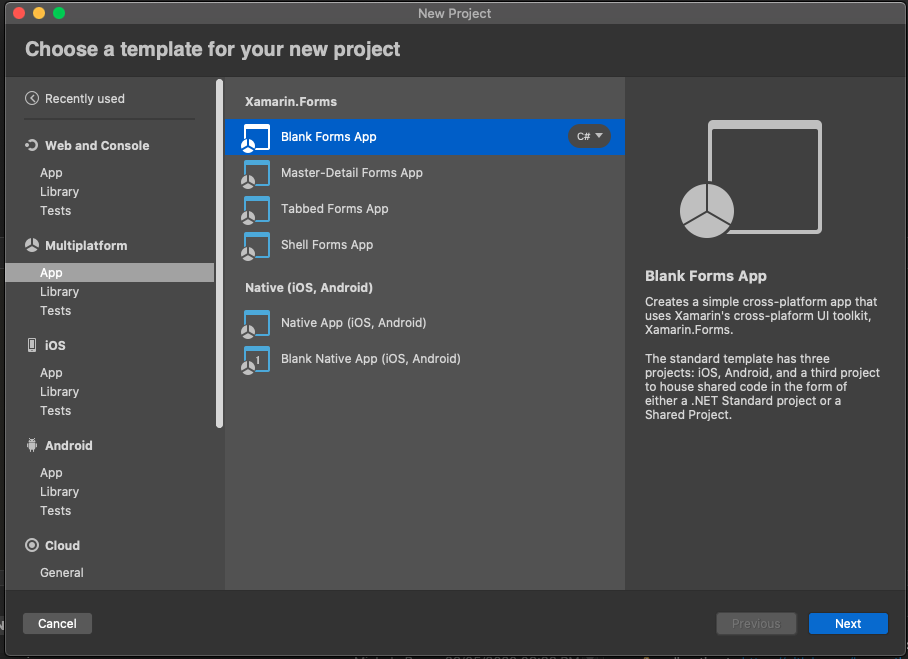
To set up a solution, we will use a ready template provided by xamarin for blank application. We will use the Blank Forms App (Multiplatform) provided by Xamarin. This template shares code using a .NET Standard Shared project. Let name the project as Appointment.
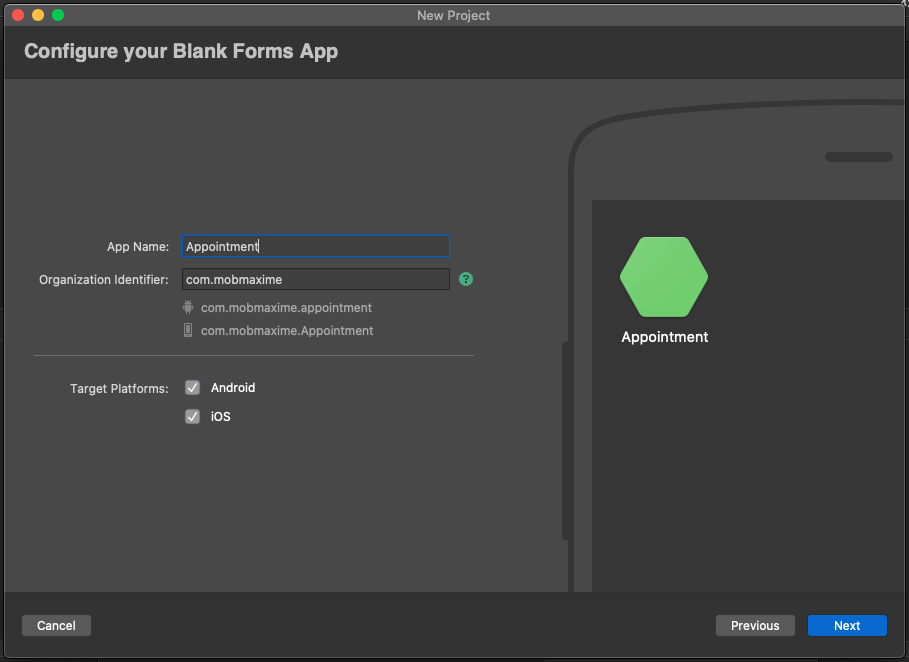
Visual Studio will create the basic structure of the solution, including the platform-specific project & one shared project
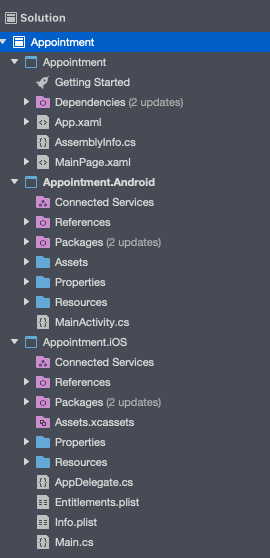
The shared project will have everything that can be shared between the other platforms. The other projects will use the platform specific code, such as custom renderers, library initializations & dependency services.
Installing the Nuget packages
After setting up the solution, we can start by installing the necessary Nuget packages. For every project in the solution, we need to update the Xamarin.Forms Nuget package to the latest available version.
Next we will install the Xamarin.Plugin.Calendar package in the shared & platform-specific projects. Open Nuget Package Manager by right clicking on NuGet in Dependencies -> NuGet in your shared project as shown in the below image.
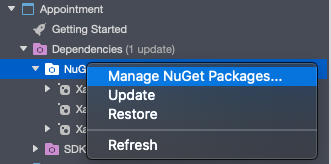
Now search for Xamarin.Plugin.Calendar package & install the latest package version available.
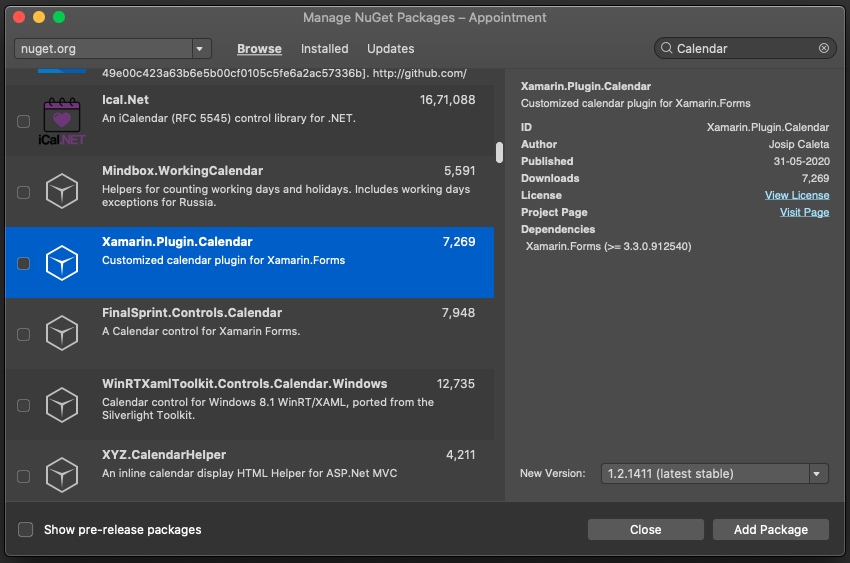
The console will report that every package is installed successfully.
Defining the Appointment Class Model
Before creating the necessary pages, we will define the Appointment class model that holds our list of appointments.
As you would expect, the Appointment class should have
at least Date, Title and Description so let’s define it this way :
using System;
using System.Windows.Input;
using Appointment.ViewModels;
using Xamarin.Forms;

namespace Appointment.Models
{
public class AppointmentModel : BaseNotifyPropertyChanged
{
bool _isSelected;
string _title, _description;
DateTime _date;

public ICommand SelectedCommand { get; private set; }

public AppointmentModel()
{
SelectedCommand = new Command(() => {
IsSelected = !IsSelected;
});
}

public bool IsSelected {
get => _isSelected;
set {
_isSelected = value;
OnPropertyChanged();
OnPropertyChanged(nameof(SelectedImage));
}
}

public string Title {
get => _title;
set {
_title = value;
OnPropertyChanged();
}
}

public string Description {
get => _description;
set {
_description = value;
OnPropertyChanged();
}
}

public DateTime Date {
get => _date;
set {
_date = value;
OnPropertyChanged();
}
}

public string SelectedImage => IsSelected ? "ic_check" : "ic_uncheck";
}
}
Creating the Raw Layout
After creating the blank application, adding packages and setting up the model, now we can focus on implementing the layout for adding/deleting appointments. For this purpose, we will create a Forms Xaml Page, which will host a view with Calendar and two buttons for adding & deleting the appointments in the toolbar.
<?xml version="1.0" encoding="utf-8"?>
<ContentPage
xmlns="http://xamarin.com/schemas/2014/forms"
xmlns:x="http://schemas.microsoft.com/winfx/2009/xaml"
xmlns:d="http://xamarin.com/schemas/2014/forms/design"
xmlns:mc="http://schemas.openxmlformats.org/markup-compatibility/2006"
xmlns:controls="clr-namespace:Xamarin.Plugin.Calendar.Controls;assembly=Xamarin.Plugin.Calendar"
xmlns:views="clr-namespace:Appointment.Views"
xmlns:viewModel="clr-namespace:Appointment.ViewModels"
mc:Ignorable="d"
x:Class="Appointment.Pages.MainPage"
Title="Appointment">
<ContentPage.BindingContext>
<viewModel:MainPageViewModel />
</ContentPage.BindingContext>
<ContentPage.ToolbarItems>
<ToolbarItem
IconImageSource="ic_add"
Command="{Binding AppointmentAddCommand}" />
<ToolbarItem
IconImageSource="ic_delete"
Command="{Binding AppointmentDeleteCommand}" />
</ContentPage.ToolbarItems>
<StackLayout
Padding="10">
<controls:Calendar
x:Name="calendar"
HorizontalOptions="FillAndExpand"
VerticalOptions="FillAndExpand"
AnimateCalendar="True"
Events="{Binding Events}"
SelectedDate="{Binding SelectedDate}"
SelectedDateColor="Red"
SelectedDateTextFormat="ddd, dd MMM yyyy"
SwipeUpToHideEnabled="False">
<controls:Calendar.HeaderSectionTemplate>
<DataTemplate>
<views:CalendarHeaderView />
</DataTemplate>
</controls:Calendar.HeaderSectionTemplate>
<controls:Calendar.FooterSectionTemplate>
<DataTemplate>
<views:CalendarFooterView />
</DataTemplate>
</controls:Calendar.FooterSectionTemplate>
<controls:Calendar.EventTemplate>
<DataTemplate>
<views:CalendarEventView />
</DataTemplate>
</controls:Calendar.EventTemplate>
<controls:Calendar.EmptyTemplate>
<DataTemplate>
<StackLayout
Padding="20,5">
<Label
Text="No Appointment for selected date"
FontSize="14"
HorizontalTextAlignment="Center"
VerticalTextAlignment="Center" />
</StackLayout>
</DataTemplate>
</controls:Calendar.EmptyTemplate>
</controls:Calendar>
</StackLayout>
</ContentPage>
The Calendar library already provides a list to show the appointments below Calendar. We can create the custom view for the list in the EventTemplate property. We can also modify the header & footer of the Calendar using the property of HeaderTemplate & FooterTemplate.
CalendarEventView:
<?xml version="1.0" encoding="UTF-8"?>
<StackLayout
xmlns="http://xamarin.com/schemas/2014/forms"
xmlns:x="http://schemas.microsoft.com/winfx/2009/xaml"
x:Class="Appointment.Views.CalendarEventView"
Padding="10,8"
Spacing="5"
Orientation="Vertical">
<Label
FontSize="16"
FontAttributes="Bold">
<Label.FormattedText>
<FormattedString>
<Span
Text="{Binding Date, StringFormat='{0:HH\\:mm}'}" />
<Span
Text=" - " />
<Span
Text="{Binding Title}" />
</FormattedString>
</Label.FormattedText>
</Label>
<Label
Text="{Binding Description}"
FontSize="14"
HorizontalTextAlignment="Start"
VerticalTextAlignment="Center" />
</StackLayout>
CalendarHeaderView:
<?xml version="1.0" encoding="UTF-8"?>
<Grid
xmlns="http://xamarin.com/schemas/2014/forms"
xmlns:x="http://schemas.microsoft.com/winfx/2009/xaml"
x:Class="Appointment.Views.CalendarHeaderView"
Padding="30,10"
ColumnSpacing="10"
HorizontalOptions="FillAndExpand">
<Grid.ColumnDefinitions>
<ColumnDefinition
Width="30" />
<ColumnDefinition
Width="*" />
<ColumnDefinition
Width="30" />
</Grid.ColumnDefinitions>
<Grid
Grid.Column="0">
<ImageButton
HeightRequest="24"
WidthRequest="24"
HorizontalOptions="Center"
VerticalOptions="Center"
Source="ic_previous"
Command="{Binding PrevMonthCommand}"
BackgroundColor="Transparent" />
</Grid>
<Label
Grid.Column="1"
TextColor="Red"
FontSize="Medium"
FontAttributes="Bold"
HorizontalTextAlignment="Center"
VerticalTextAlignment="Center">
<Label.FormattedText>
<FormattedString>
<Span
Text="{Binding MonthText, Mode=TwoWay}" />
<Span
Text=", " />
<Span
Text="{Binding Year, Mode=TwoWay}" />
</FormattedString>
</Label.FormattedText>
</Label>
<Grid
Grid.Column="2">
<ImageButton
HeightRequest="24"
WidthRequest="24"
HorizontalOptions="Center"
VerticalOptions="Center"
Source="ic_next"
Command="{Binding NextMonthCommand}"
BackgroundColor="Transparent" />
</Grid>
</Grid>
CalendarFooterView:
<?xml version="1.0" encoding="UTF-8"?>
<Grid
xmlns="http://xamarin.com/schemas/2014/forms"
xmlns:x="http://schemas.microsoft.com/winfx/2009/xaml"
x:Class="Appointment.Views.CalendarFooterView"
ColumnSpacing="10"
Padding="10,0">
<Grid.ColumnDefinitions>
<ColumnDefinition
Width="*" />
<ColumnDefinition
Width="30" />
</Grid.ColumnDefinitions>
<Label
Grid.Column="0"
Text="{Binding SelectedDateText}"
TextColor="{Binding SelectedDateColor}"
FontAttributes="Bold"
FontSize="Medium"
HorizontalTextAlignment="Start"
VerticalTextAlignment="Center" />
<ImageButton
Grid.Column="1"
HeightRequest="30"
WidthRequest="30"
HorizontalOptions="Center"
VerticalOptions="Center"
Source="ic_arrow_up"
Command="{Binding ShowHideCalendarCommand}"
BackgroundColor="Transparent">
<ImageButton.Triggers>
<DataTrigger
Binding="{Binding CalendarSectionShown}"
TargetType="ImageButton"
Value="false">
<Setter
Property="Rotation"
Value="180" />
</DataTrigger>
</ImageButton.Triggers>
</ImageButton>
</Grid>
We will use the built in xamarin navigation for navigating between different pages. We’ll use NavigationPage to navigate the application to our MainPage from the application constructor like this:
public App()
{
InitializeComponent();

MainPage = new NavigationPage(new MainPage()) {
BarBackgroundColor = Color.FromHex("2196F3"),
BarTextColor = Color.White
};
}

In the code behind our MainPage, we will set the minimum & maximum date for Calendar.

using System;
using Xamarin.Forms;

namespace Appointment.Pages
{
public partial class MainPage : ContentPage
{
public MainPage()
{
InitializeComponent();

calendar.MinimumDate = new DateTime(1970, 1, 1);
calendar.MaximumDate = new DateTime(2030, 1, 1);
}
}
}

The main logic for adding / deleting appointments & navigating between pages lies in the view model class.

using System;
using System.Collections.ObjectModel;
using System.Linq;
using System.Windows.Input;
using Appointment.Models;
using Appointment.Pages;
using Xamarin.Forms;
using Xamarin.Plugin.Calendar.Models;

namespace Appointment.ViewModels
{
public class MainPageViewModel : BaseNotifyPropertyChanged
{
DateTime _selectedDate;
EventCollection _events;

public ICommand AppointmentAddCommand { get; private set; }
public ICommand AppointmentDeleteCommand { get; private set; }

public MainPageViewModel()
{
SelectedDate = DateTime.Now;
Events = new EventCollection();

AppointmentAddCommand = new Command(TapOnAdd);
AppointmentDeleteCommand = new Command(TapOnDelete);
}

private async void TapOnAdd(object obj)
{
var page = new AddPage(SelectedDate);

page.Added += (appointment) => {
if (Events.ContainsKey(appointment.Date)) {
var events = Events[appointment.Date] as ObservableCollection<AppointmentModel>;
events.Add(appointment);
} else {
Events.Add(appointment.Date, new ObservableCollection<AppointmentModel> { appointment });
}
};

await App.PushModalAsync(page);
}

private async void TapOnDelete(object obj)
{
if (!Events.Any()) {
return;
}

if (Events[SelectedDate].Count == 1) {
Events.Remove(SelectedDate);

} else {
var events = Events[SelectedDate] as ObservableCollection<AppointmentModel>;
var page = new DeletePage(events);

page.Deleted += (appointments) => {
if (appointments.Count == 0) {
Events.Remove(SelectedDate);
} else {
Events[SelectedDate] = appointments;
}
};

await App.PushModalAsync(page);
}
}

public DateTime SelectedDate {
get => _selectedDate;
set {
_selectedDate = value;
OnPropertyChanged();
}
}

public EventCollection Events {
get => _events;
set {
_events = value;
OnPropertyChanged();
}
}
}
}
This completes the raw layout of our application.
Add an Appointment
Next, we will move on to adding an appointment. We’ll create a page that should allow the user to add the properties of an Appointment: Date, Title and Description.
To enable the user to fill in these properties, we will use a DatePicker, TimePicker and Entry. We will use StackLayout to group this all fields in the page like this:
<?xml version="1.0" encoding="UTF-8"?>
<ContentPage
xmlns="http://xamarin.com/schemas/2014/forms"
xmlns:x="http://schemas.microsoft.com/winfx/2009/xaml"
x:Class="Appointment.Pages.AddPage"
Title="Add Appointment">
<ContentPage.ToolbarItems>
<ToolbarItem
IconImageSource="ic_close"
Clicked="ToolbarItem_Clicked" />
</ContentPage.ToolbarItems>
<ContentPage.Content>
<StackLayout
Spacing="8"
Padding="20"
Orientation="Vertical">
<Label
Text="Date"
TextColor="Gray"
FontSize="14"
HorizontalTextAlignment="Start"
VerticalTextAlignment="Center" />
<DatePicker
x:Name="datePicker"
HeightRequest="40"
FontSize="16"
TextColor="Black"
Format="dd MMM yyyy"
HorizontalOptions="FillAndExpand" />
<Label
Margin="0,10,0,0"
Text="Time"
TextColor="Gray"
FontSize="14"
HorizontalTextAlignment="Start"
VerticalTextAlignment="Center" />
<TimePicker
x:Name="timePicker"
HeightRequest="40"
FontSize="16"
TextColor="Black"
Format="hh:mm tt"
HorizontalOptions="FillAndExpand" />
<Label
Margin="0,10,0,0"
Text="Title"
TextColor="Gray"
FontSize="14"
HorizontalTextAlignment="Start"
VerticalTextAlignment="Center" />
<Entry
x:Name="title"
TextColor="Black"
FontSize="16"
HeightRequest="40"
ReturnType="Next"
HorizontalOptions="FillAndExpand" />
<Label
Margin="0,10,0,0"
Text="Description"
TextColor="Gray"
FontSize="14"
HorizontalTextAlignment="Start"
VerticalTextAlignment="Center" />
<Entry
x:Name="description"
TextColor="Black"
FontSize="16"
HeightRequest="40"
ReturnType="Done"
HorizontalOptions="FillAndExpand" />
<Button
Text="Done"
TextColor="White"
FontSize="14"
CornerRadius="3"
HeightRequest="40"
VerticalOptions="EndAndExpand"
Clicked="Done_Clicked"
BackgroundColor="Teal" />
</StackLayout>
</ContentPage.Content>
</ContentPage>
The code behind this page handles the button click event and, based on the user selection, creates an appointment.
using System;
using Appointment.Models;
using Xamarin.Forms;

namespace Appointment.Pages
{
public partial class AddPage : ContentPage
{
public Action<AppointmentModel> Added { get; set; }

public AddPage(DateTime selectedDate)
{
InitializeComponent();

datePicker.MinimumDate = new DateTime(1970, 1, 1);
datePicker.MaximumDate = new DateTime(2030, 1, 1);

datePicker.Date = selectedDate.Date;
timePicker.Time = DateTime.Now.TimeOfDay;
}

void ToolbarItem_Clicked(object sender, EventArgs e)
{
Navigation.PopModalAsync();
}

async void Done_Clicked(object sender, EventArgs e)
{
if (string.IsNullOrWhiteSpace(title.Text)) {
await App.DisplayAlert("Please enter title");
return;
}

if (string.IsNullOrWhiteSpace(description.Text)) {
await App.DisplayAlert("Please enter description");
return;
}

Added?.Invoke(new AppointmentModel {
Title = title.Text,
Description = description.Text,
Date = datePicker.Date.Add(timePicker.Time)
});

await Navigation.PopModalAsync();
}
}
}
Delete an Appointment
Now we will create a page that will help the user to delete an appointment. If a date has one appointment, it’ll delete it directly. If there is more than one appointment then it should be able to get them and list them in a ListView component. After that, a button click will delete the user selection. To achieve this, we will use a ListView and a Button components like this:
<?xml version="1.0" encoding="UTF-8"?>
<ContentPage
xmlns="http://xamarin.com/schemas/2014/forms"
xmlns:x="http://schemas.microsoft.com/winfx/2009/xaml"
x:Class="Appointment.Pages.DeletePage"
Title="Delete Appointment">
<ContentPage.ToolbarItems>
<ToolbarItem
IconImageSource="ic_close"
Clicked="ToolbarItem_Clicked" />
</ContentPage.ToolbarItems>
<ContentPage.Content>
<Grid
RowSpacing="10">
<Grid.RowDefinitions>
<RowDefinition
Height="*" />
<RowDefinition
Height="Auto" />
</Grid.RowDefinitions>
<ListView
x:Name="lstView"
Grid.Row="0"
SeparatorVisibility="None"
HasUnevenRows="True"
Header=""
ItemsSource="{Binding Appointments}">
<ListView.HeaderTemplate>
<DataTemplate>
<StackLayout
Padding="15"
Orientation="Vertical">
<Label
Text="Select an appointment to delete"
TextColor="Gray"
FontSize="13"
HorizontalTextAlignment="Start"
VerticalTextAlignment="Center" />
</StackLayout>
</DataTemplate>
</ListView.HeaderTemplate>
<ListView.ItemTemplate>
<DataTemplate>
<ViewCell>
<Grid
Padding="20,8"
ColumnSpacing="15">
<Grid.ColumnDefinitions>
<ColumnDefinition
Width="30" />
<ColumnDefinition
Width="*" />
</Grid.ColumnDefinitions>
<Image
Grid.Column="0"
HeightRequest="20"
WidthRequest="20"
HorizontalOptions="Center"
VerticalOptions="Center"
Source="{Binding SelectedImage}" />
<StackLayout
Grid.Column="1"
Spacing="5"
Orientation="Vertical">
<Label
FontSize="16"
FontAttributes="Bold">
<Label.FormattedText>
<FormattedString>
<Span
Text="{Binding Date, StringFormat='{0:HH\\:mm}'}" />
<Span
Text=" - " />
<Span
Text="{Binding Title}" />
</FormattedString>
</Label.FormattedText>
</Label>
<Label
Text="{Binding Description}"
FontSize="14"
HorizontalTextAlignment="Start"
VerticalTextAlignment="Center" />
</StackLayout>
<Grid.GestureRecognizers>
<TapGestureRecognizer
Command="{Binding SelectedCommand}" />
</Grid.GestureRecognizers>
</Grid>
</ViewCell>
</DataTemplate>
</ListView.ItemTemplate>
</ListView>
<Grid
Grid.Row="1"
Padding="20,0,20,20">
<Button
Text="Delete"
TextColor="White"
FontSize="14"
CornerRadius="3"
HeightRequest="40"
VerticalOptions="EndAndExpand"
Clicked="Delete_Clicked"
BackgroundColor="Teal" />
</Grid>
</Grid>
</ContentPage.Content>
</ContentPage>

The code behind this page will handle the click of the button, which will delete the selected appointment like this:

using System;
using System.Collections.ObjectModel;
using System.Linq;
using Appointment.Models;
using Appointment.ViewModels;
using Xamarin.Forms;

namespace Appointment.Pages
{
public partial class DeletePage : ContentPage
{
DeleteAppointmentViewModel viewModel;

public Action<ObservableCollection<AppointmentModel>> Deleted { get; set; }

public DeletePage(ObservableCollection<AppointmentModel> appointmentList)
{
InitializeComponent();
BindingContext = viewModel = new DeleteAppointmentViewModel(appointmentList);
}

void ToolbarItem_Clicked(object sender, EventArgs e)
{
Navigation.PopModalAsync();
}

void Delete_Clicked(object sender, EventArgs e)
{
var selectedList = viewModel.Appointments.Where(x => x.IsSelected).ToList();

foreach (var item in selectedList) {
viewModel.Appointments.Remove(item);
}

Deleted?.Invoke(viewModel.Appointments);
Navigation.PopModalAsync();
}
}
}
That’s it! Now run the project and add a few appointments.
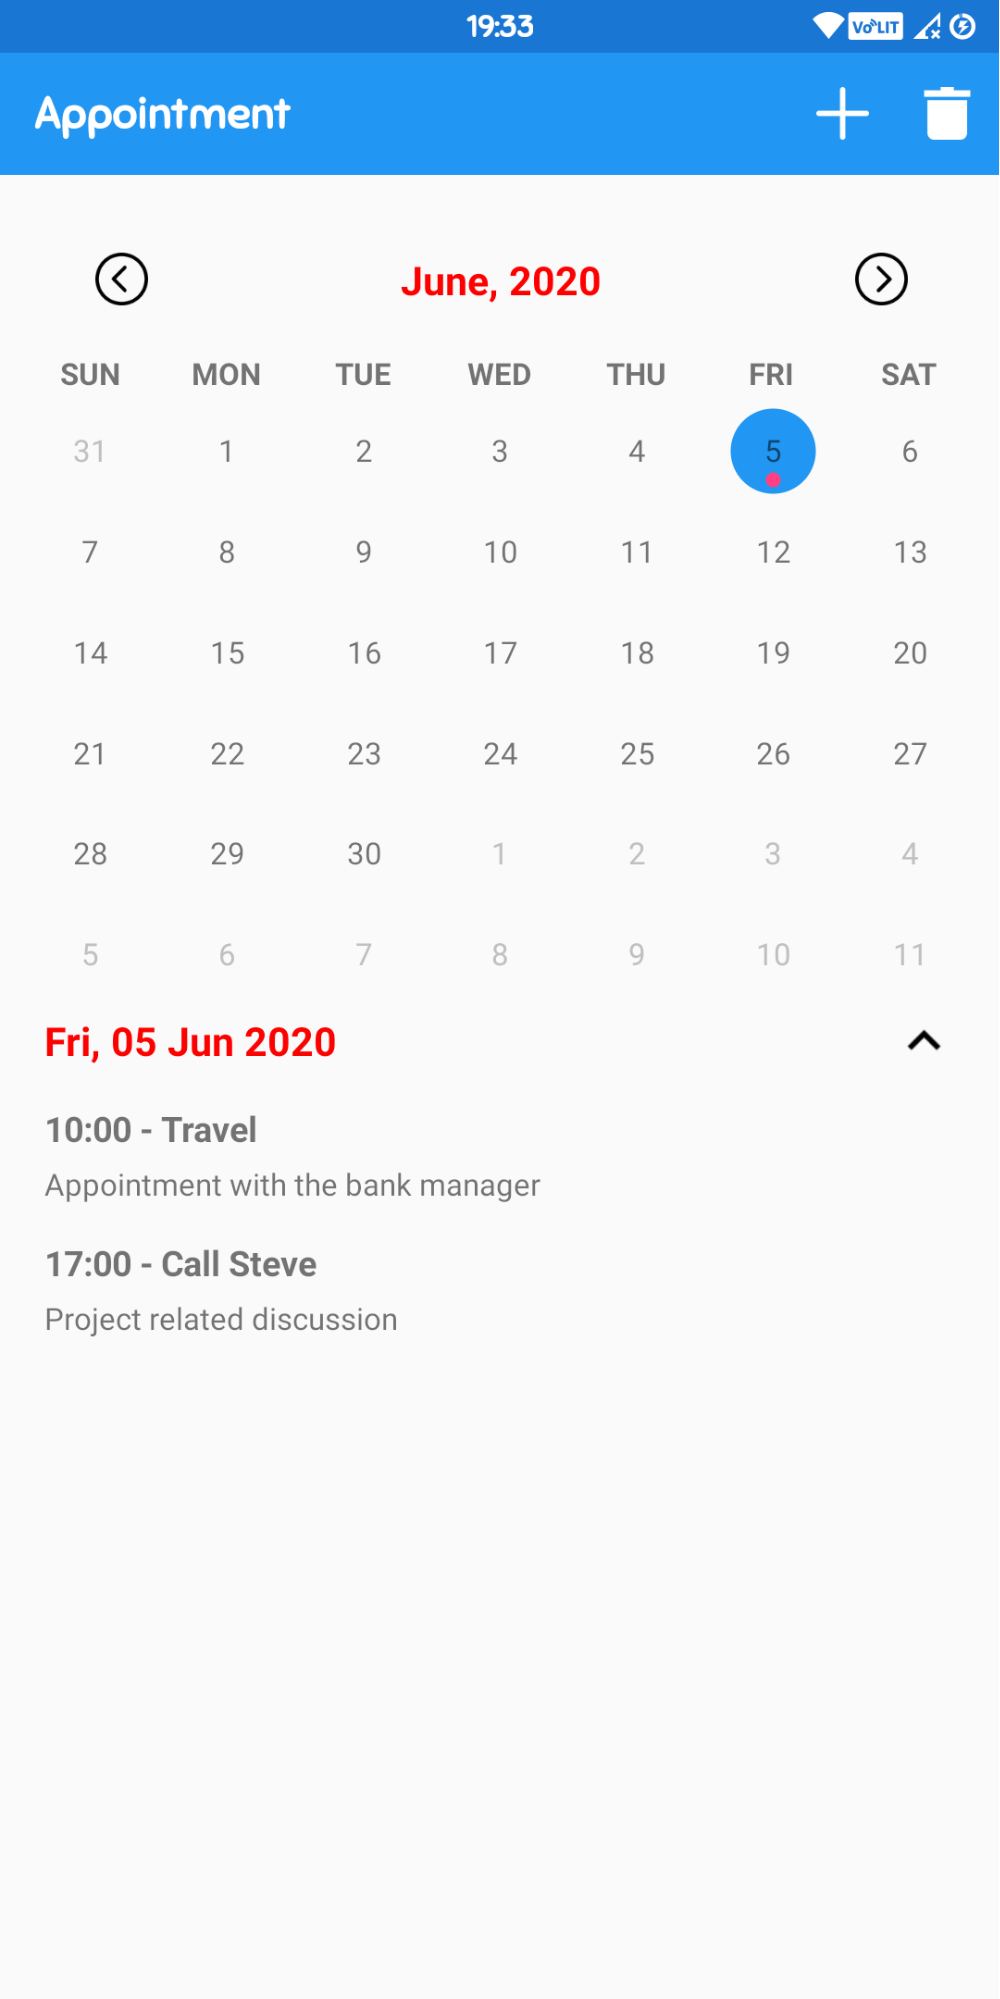
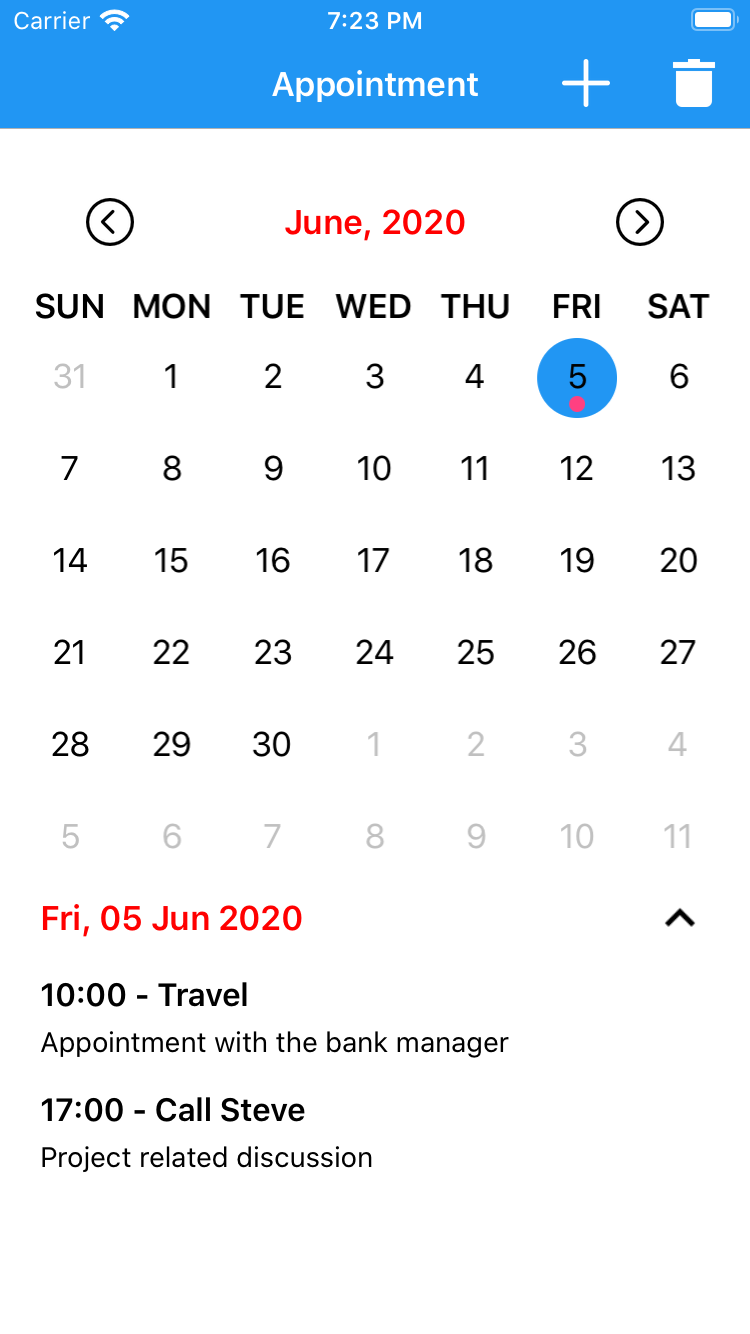
You can find the complete project at Download.
Happy Coding!
Join 10,000 subscribers!
Join Our subscriber’s list and trends, especially on mobile apps development.I hereby agree to receive newsletters from Mobmaxime and acknowledge company's Privacy Policy.
