Create Art with Sketchy: Sketch-Making Flask App
Have you ever wanted to turn your favorite photographs into artistic pencil sketches with just a click? Meet Sketchy, a Flask-based web application that does just that! This app takes your uploaded image and transforms it into a beautiful pencil sketch. Here’s how it works and how you can create something similar.
How Does Sketchy Work?
Sketchy is built with Python and leverages the power of OpenCV, a popular computer vision library, to process images. Using a sleek Flask interface, the app allows you to upload an image, process it, and download the sketch version — all through a browser.
The magic happens in a function called make_sketch(), where an image undergoes several transformations to achieve that pencil sketch effect. The process includes converting the image to grayscale, inverting it, applying Gaussian blur, and blending the grayscale with the blurred image.
Features of Sketchy
- Simple and intuitive UI.
- Supports multiple image formats like PNG, JPG, and JPEG.
- Processes images in real-time.
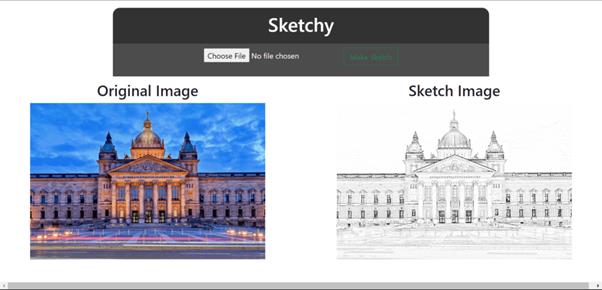
- Automatically displays the original and sketched image side by side.
Code Walkthrough
The Flask Backend
The Flask app is the brain of Sketchy. Here’s a snippet of the main functionalities:
- Upload and Validate Images
The app only accepts specific file types (PNG, JPG, JPEG). Validation is handled by the allowed_file() function.
- Sketch Creation/ Image Processing
- Converts the image to grayscale.
- Inverts the grayscale image to highlight edges.
- Applies a Gaussian blur for a smooth finish.
- Blends the grayscale and blurred images to produce a sketch effect.
The make_sketch() function uses OpenCV to apply several image transformations for the sketch effect.
The make_sketch() function processes the image step-by-step:
def make_sketch(img, contrast_scale=0.5):
grayed = cv2.cvtColor(img, cv2.COLOR_BGR2GRAY)
inverted = cv2.bitwise_not(grayed)
blurred = cv2.GaussianBlur(inverted, (19, 19), sigmaX=0, sigmaY=0)
# Blend the grayscale with the blurred image more softly
adjusted_blurred = cv2.addWeighted(blurred, 1 / contrast_scale, 255 – blurred, 1 – (1 / contrast_scale), 0)
final_result = cv2.divide(grayed, 255 – adjusted_blurred, scale=256)
return final_result
- HTML Frontend
The user interface is designed using a combination of basic HTML, CSS, and Bootstrap for responsiveness. Users can upload their images, and the app dynamically displays the results.
Dynamic Rendering
Jinja2 templating enables dynamic content on the webpage. If a sketch is generated, it automatically displays alongside the original image.
Here’s the form where users upload their images:
<form action=’/sketch’ class=’main-form’ method=”POST” enctype=”multipart/form-data”>
<div class=’text-center’>
<input type=”file” id=”file” name=’file’ style=”margin-top:10px;margin-bottom:10px;”>
<button type=’submit’ class=’btn btn-outline-success’> Make Sketch
</button>
</div>
</form>
Here’s the full app.py code:
import cv2
import os
from werkzeug.utils import secure_filename
from flask import Flask,request,render_template
UPLOAD_FOLDER = ‘static/uploads’
ALLOWED_EXTENSIONS = set([‘png’, ‘jpg’, ‘jpeg’])
app = Flask(__name__)
app.config[‘SEND_FILE_MAX_AGE_DEFAULT’] = 0
app.config[‘UPLOAD_FOLDER’] = UPLOAD_FOLDER
app.secret_key = “secret key”
def allowed_file(filename):
return ‘.’ in filename and filename.rsplit(‘.’, 1)[1] in ALLOWED_EXTENSIONS
def make_sketch(img, contrast_scale=0.5):
grayed = cv2.cvtColor(img, cv2.COLOR_BGR2GRAY)
inverted = cv2.bitwise_not(grayed)
blurred = cv2.GaussianBlur(inverted, (19, 19), sigmaX=0, sigmaY=0)
# Blend the grayscale with the blurred image more softly
adjusted_blurred = cv2.addWeighted(blurred, 1 / contrast_scale, 255 – blurred, 1 – (1 / contrast_scale), 0)
final_result = cv2.divide(grayed, 255 – adjusted_blurred, scale=256)
return final_result
@app.route(‘/’)
def home():
return render_template(‘home.html’)
@app.route(‘/sketch’,methods=[‘POST’])
def sketch():
file = request.files[‘file’]
if file and allowed_file(file.filename):
filename = secure_filename(file.filename)
file.save(os.path.join(app.config[‘UPLOAD_FOLDER’], filename))
img = cv2.imread(UPLOAD_FOLDER+’/’+filename)
sketch_img = make_sketch(img, contrast_scale=1.0)
sketch_img_name = filename.split(‘.’)[0]+”_sketch.jpg”
_ = cv2.imwrite(UPLOAD_FOLDER+’/’+sketch_img_name, sketch_img)
return render_template(‘home.html’,org_img_name=filename,sketch_img_name=sketch_img_name)
if __name__ == ‘__main__’:
app.run(debug=True)
The Home Page (HTML)
The front end, built using HTML and CSS, ensures a user-friendly experience. Here’s the core structure of the home.html:
<!doctype html>
<html lang=”en”>
<style type=’text/css’>
body {
font-family: sans-serif;
margin-top: 40px;
}
.regform {
width: 800px;
background-color: rgb(0, 0, 0, 0.8);
margin: auto;
color: #FFFFFF;
padding: 10px 0px 10px 0px;
text-align: center;
border-radius: 15px 15px 0px 0px;
}
.main-form {
width: 800px;
margin: auto;
background-color: rgb(0, 0, 0, 0.7);
padding-left: 50px;
padding-right: 50px;
padding-bottom: 20px;
color: #FFFFFF;
}
img {
max-height: 400px;
max-width: 500px;
height: auto;
width: auto;
}
</style>
<head>
<!– Required meta tags –>
<meta charset=”utf-8″>
<meta name=”viewport” content=”width=device-width, initial-scale=1″>
<!– Bootstrap CSS –>
<link href=”https://cdn.jsdelivr.net/npm/bootstrap@5.0.0-beta3/dist/css/bootstrap.min.css” rel=”stylesheet”
integrity=”sha384-eOJMYsd53ii+scO/bJGFsiCZc+5NDVN2yr8+0RDqr0Ql0h+rP48ckxlpbzKgwra6″ crossorigin=”anonymous”>
<title>Sketchy</title>
</head>
<body>
<div class=’regform mt-3′>
<h1>Sketchy</h1>
</div>
<form action=’/sketch’ class=’main-form’ method=”POST” enctype=”multipart/form-data”>
<div class=’text-center’>
<input type=”file” id=”file” name=’file’ style=”margin-top:10px;margin-bottom:10px;”>
<button type=’submit’ class=’btn btn-outline-success’> Make Sketch
</button>
</div>
</form>
{% if sketch_img_name %}
<div class=”row” style=”margin-top:10px;margin-bottom:10px;”>
<div class=”col text-center”>
<h2>Original Image</h2><img src=’../static/uploads/{{ org_img_name }}’
style=”display: block;margin-left: auto;margin-right: auto;”>
</div>
<div class=”col text-center”>
<h2>Sketch Image</h2><img src=’../static/uploads/{{ sketch_img_name }}’
style=”display: block;margin-left: auto;margin-right: auto;”>
</div>
</div>
{% endif %}
</body>
</html>
Folders Hierarchy
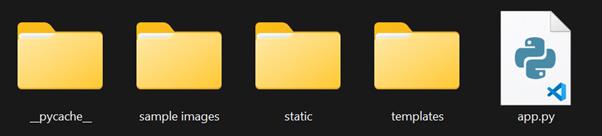
Create a file app.py and copy-paste the code from above to that file.
Now create a folder called templates and create a home.html file in it and copy-paste the code from above to that file.
Now create a folder called static.
Create one more folder called uploads inside static.
Both static and uploads are empty folders.
_pycache_ is automatically created (You can ignore this).
How to Set Up Sketchy
- Install Dependencies
Ensure you have Python installed along with Flask and OpenCV:
pip install flask opencv-python
- Run the App
Save the code, navigate to the project directory, and run:
python app.py
- Access in Browser
Open your browser and go to http://127.0.0.1:5000.
Snapshot of our Sketch-making Flask App
Conclusion
Sketchy isn’t just a fun project — it’s a creative tool that showcases the power of Flask and OpenCV. Whether you’re a Python enthusiast, a designer, or just someone curious about image processing, Sketchy is a great way to explore and create. Give it a try and let your photos come to life as art!
If you need you have any query then please discuss with expert.
Join 10,000 subscribers!
Join Our subscriber’s list and trends, especially on mobile apps development.I hereby agree to receive newsletters from Mobmaxime and acknowledge company's Privacy Policy.