Want to Know About Flutter? This One Guide is Enough!
Flutter has grown impressively in recent years. The Dart-based technology is one of Google’s leading cross-platform app development frameworks and has achieved several milestones in its journey.
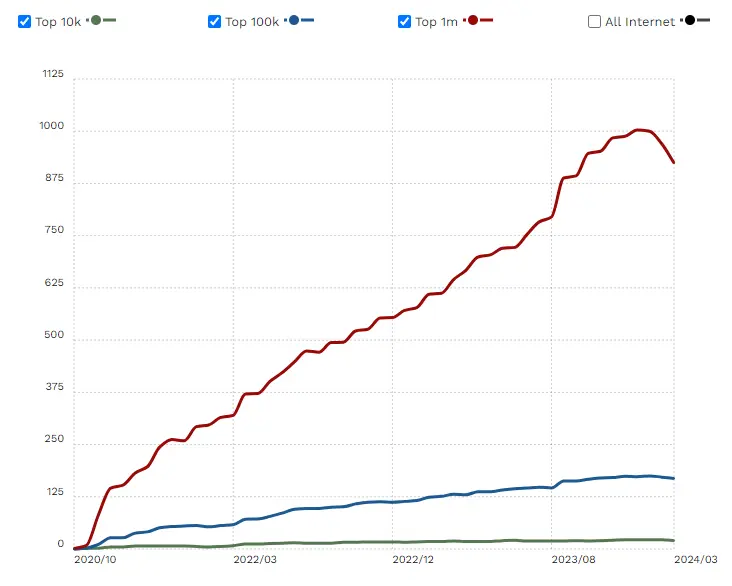
At the time of writing, 91,420 websites were built using Flutter 56,685, of which 685 are live and running. More than 1200 websites built on Flutter are among the top 1 million, and 24 are among the top 10,000.
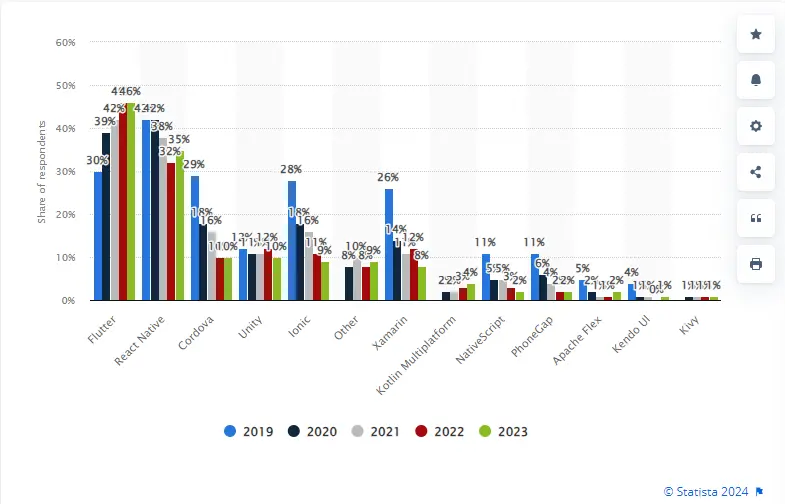
Today when more than 46% of software developers use Flutter, which shows the framework’s capabilities. In 2018, Flutter went public, marking a significant turning point as one of the stable frameworks for mobile app development.
While mobile app development with Flutter was already happening, in 2020, the Flutter 1.17 version introduced the Canvas Kit renderer, allowing developers to create web applications with Flutter.
Such milestones have continued to pour out from Flutter’s development team, making it one of the first choices for cross-platform app development.
In this guide, we will discuss everything related to Flutter, including its origin, architecture, layout, syntax, and much more.
What is Flutter? Tracing is History, Core Functionalities, and Capabilities
Flutter is an open-source software development kit (SKD) built by Google and is used to build cross-platform mobile applications. Using Flutter, developers can build high-performance and scalable applications that also have functional user interfaces that work seamlessly on Android and iOS platforms.
This framework uses Dart programming language and compiles to binary code, ensuring that it experiences seamless performance with other programming languages like Objective-C, Swift, Java, and Kotlin.
In addition to this, consider the fact that Flutter uses a library of pre-built widgets. These widgets ease the development experience for beginner to experienced developers.
Tracing the History of Flutter
In Early 2014, Google’s team got the idea to create a framework that can help build smooth and visually stunning interfaces without putting in much work.
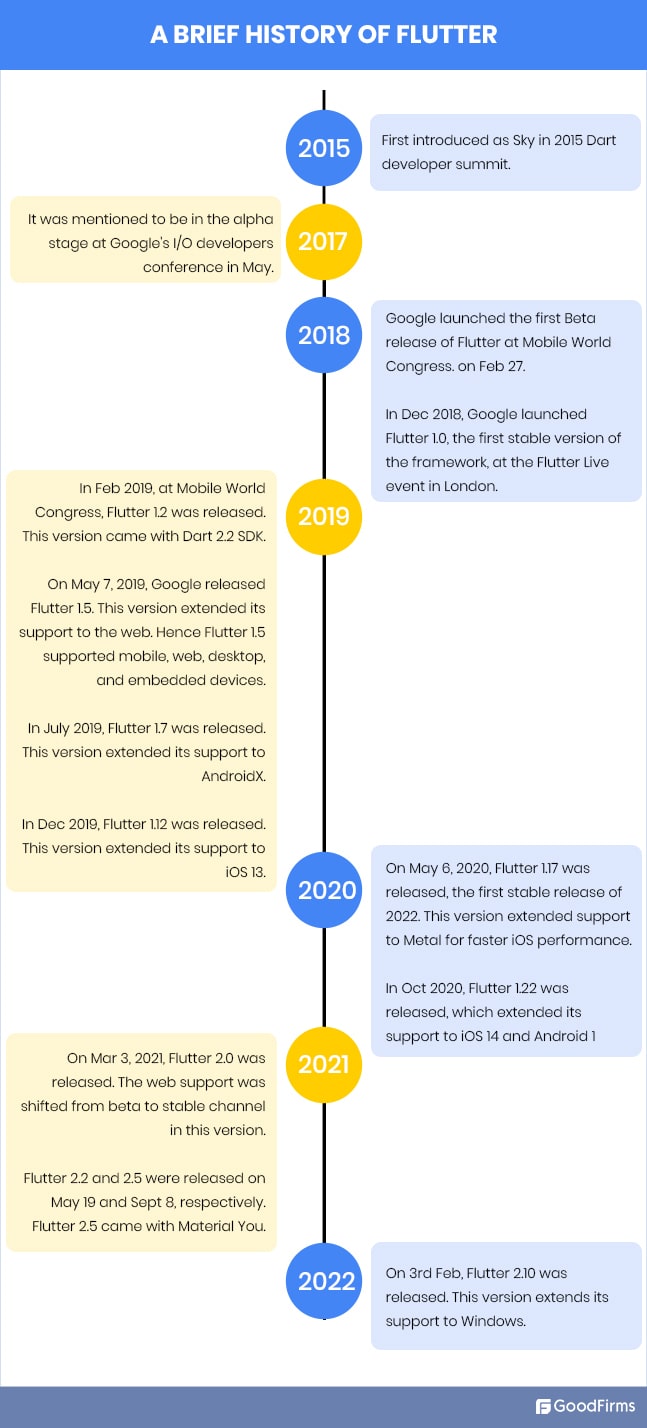
Source: Flutter history
- October 2014: The Project Sky launches, a precursor to Flutter, were unveiled at the Dart development summit. The focus of this project was for the user interface to achieve a frame rate of 120 fps while making them more responsive and delivering a visually fluid experience.
- Between 2015 and 2017: In these two years, Project Sky was developing with two key motives;
-
- Improve core functionalities
- Widget-based UI approach
During these two years, the team behind Project Sky and Futter also completed extensive internal testing and refinement. This laid the groundwork for Flutter as we see and use it today.
- May 2017: It was in May 2017 that Google announced Flutter at the Google I/O Conference. This was the day when Flutter transitioned from an in-house project to a publicly available development framework, this was the day I started exploring Flutter.
Here’s what I experienced after the first release;
-
- The Hot Reload functionality was an amazing thing to experience first-hand.
- Now we could use a wide array of to build several UI elements.
- The custom rendering engine helped us build native-like application interfaces for Android and iOS platforms.
Post-launch, we have seen a wholesome response from the development community to using Flutter for mobile app development.
Working with Flutter demands that developers check out the requisite resources to learn more about the framework and stay updated on its developments. For this purpose, bookmark the Flutter.dev website as it’s a comprehensive source for everything related to Flutter. On the website, you will find tutorials, documents, and code samples along with access to the community forum. Navigate to https://docs.flutter.dev/ to access all the resources at one place.
Flutter’s Core Functionalities and Capabilities
Working with Flutter, developers must be aware of its core capabilities and functionalities to exploit the technology’s true potential.
-
Declarative UI and Stateful Widgets
Flutter is built around a declarative UI paradigm. This means that during development, you can describe the desired state of the UI, and the framework will render it on the screen.
For instance, you can tell Flutter what elements you wish to see in the UI, and the rendering process will ensure those elements are added. However, this functionality in Flutter is achieved with Stateful widgets. As these work as data warehouses, they can hold state that change over time.
As soon as the state changes, it rebuilds automatically, facilitating changes in the UI to reflect the latest data.
-
Custom Rendering with Skia
Flutter has a high-performance engine called Skia, which improves the performance of native UI toolkits. Skia provides better control of the rendering pipeline to power them to integrate features like smooth animations and build complex visuals within the application.
In their effort to deliver a consistent look and feel, Flutter developers using Skia can also render the elements directly to the native application, which gives a native-like user experience.
-
Flutter Widgets – Rich and Customizable
You will get a wide variety of widgets with Flutter, no doubt about that. But what’s better is that these building blocks can be customized to fit into your requirements. So widget-based buttons to text fields, layouts, navigation drawers, etc., can be customized.
If you don’t want to customize, use Flutter’s low-level and easy rendering primitives to create new ones from scratch. Hence, Flutter lets you develop granular control over the UI and impress your users.
-
Flutter Bloc and Provides Through Reactive Programming
One of the Flutter functionalities I always love to discuss is this one. You know Flutter boasts reactive programming. Due to this, you get simplified state management and complex applications.
This facilitates a unique aspect in Flutter applications: data changes in one part of the application can circulate to other dependent parts. This ensures the entire UI state is consistent and predictable.
-
Platform Channel Communication
With Flutter, developers have access to the core UI functionalities. As a part of the development process, they interact with platform-specific features. Access to features like device sensors and native APIs is done through platform channels.
These platform channels work as bridges between Flutter and the native platform’s code, enabling controlled access to build platform-specific functionalities.
Working with these functionalities, the developer community will experience several benefits, which I have listed below.
Getting Started with Flutter
Let’s move on to the exciting development world of Flutter and discover the process of building performant and beautiful applications. Going forward, it’s going to get fairly technical as we will explore Flutter’s architecture, layout, components, and widgets in detail. Let’s begin with the basics first starting with the requirements to work with Flutter.
System Requirements to Create Your First Flutter Project
Flutter operates smoothly on Windows, macOS, Linux, and ChromeOS systems. To use it with the operating system, you will also need a compatible Integrated Development Environment (IDE) and Git version control system.
Which Tools to Use for Flutter? (IDEs)
|
Once these are assessed,
- Install Flutter SDK after downloading it from the official website.
- Installation is simple and all you have to do is follow the instructions, which are customized to your operating system.
- Also check and install the required Dart plugins compatible with the chosen IDE.
After installation is complete, check if it’s working by running flutter –version in the terminal. Additionally, download DartPad. It’s an optional download but provides a vast playground to play around with the Dart codebase and snippets.
What is Dart Programming Language?
Flutter uses Dart programming language, which is an approachable and portable language we use to build high-quality applications. It’s a client-optimized language possessing a clean coding syntax at par with Java and JavaScript.
Due to this, the development environment of Dart benefits from aspects like strong typing, garbage collection, and asynchronous programming. As a result, the code you write is more robust while making the development process more efficient, and leads to efficient handling of tasks.
One aspect of Dart that I want to highlight here is Class and Mixins.
- Mixins: These represent a unique way to define Dart code, which can be reused in multiple hierarchies. A mixin is a class that designs reusable methods and properties by other Dart classes. One of the best practices is to use mixins for writing clear and reusable code using, mixin, with, and on.
Here’s a short example of how Mixins are used;mixin ElectricVariant { void electricVariant() {
print(‘This is an electric variant’);
}
}
mixin PetrolVariant {
void petrolVariant() {
print(‘This is a petrol variant’);
}
}
class Car with ElectricVariant, PetrolVariant {
void main() {
var car = Car();
car.electricVariant();
car.petrolVariant();
}
}
- Class: A class represents the layout of creating objects in Dart and it contains the properties and methods, behavior, and the methods of the object. Generally, we use Class to create multiple objects that have similar properties and methods.
Here’s an example of how Class is used;class Car { String engine = “E1001”;
void disp() {
print(engine);
}
}
Recently, Dart 3.4 came out in May 2024, and here are the most important developments you should know about;
- WebAssembly Support: This gives developers the capability to compile code written in Dart to WebAssembly (WASM), ensuring that Flutter applications can run on web platforms smoothly without additional plugins and tools.
- Macros: An experimental feature added to Dart with which developers can describe tailored syntax extensions. Once fully operational, this will help improve code maintainability and readability.
- Improved Type Analysis: The latest update enhances Dart’s type analysis, ensuring more accurate code checking leading to a better developer experience. Through this, it’ll be easier to identify potential errors in the development process.
In addition to these, changes and updates are observed in Dart CLI, Dart FFI, and around 50% of the reported bugs after the previous update have been resolved.
Coming back to why Flutter goes well with Dart.
- A Strong Foundation: Dart serves as a robust foundation for Flutter, giving it the necessary components and ease of use to deliver performant applications. Leveraging Dart’s C-style syntax and object-oriented programming, it’s easy to grasp even for newbies.
- In-Built Dart Features: Dart’s Just-in-Time (JIT) code compilation augments Flutter’s hot reload. This means developers can see changes to the application they are building in real-time, effectively speeding up the development iteration cycle.
Plus, Dart’s Ahead-of-Time (AOT) code compilation ensures Flutter applications experience better performance and faster startup times. This happens by improving the app’s execution time while reducing its memory footprint.
- Perfect Alignment With Flutter: Dart expresses a perfect alignment with Flutter, especially its UI capabilities. Together, these two technologies create a harmonious development environment. Furthermore, Dart’s reactive programming mode ensures you can create highly responsive and interactive UI elements.
Until today, there isn’t a better programming language than Dart that works well with Flutter.
How to Start Programming in Flutter?
To begin programming, ensure you have an in-depth understanding of the Flutter lifecycle. The life cycle represents the stages your application will go through, from creation to initialization, deployment, and receiving the user’s input.
Do you know that even an app’s termination process is a part of its development lifecycle? The Flutter.dev website I have shared above has all the steps you must follow to complete every level in the Flutter development lifecycle.
You have set up Flutter with its IDE and now the development work begins. In the command prompt terminal, go to the project creation directory and write the following code;
flutter create my_first_app
Here, you can replace my first app with the desired project name, and it will build a new Flutter project directory. Flutter takes care of delivering pre-configured files and folders for your application’s code, assets, and configuration.
To run your application based on the code written, go to the project directory through the terminal using the code;
cd my_first_app
Then, to run the development server and launch the application, use the code;
flutter run
For this code to run and launch, you will need an emulator or a connected Android.
When you create a new Flutter project, it will automatically create a file named pubspec.yml and it’s located at the top of the project tree. This file has project metadata information, including;
- Project name and description
- Dependencies
- Futter version
This completes a basic overview of how you begin using a Flutter IDE to start the project. For a better understanding of Flutter’s capabilities and potential, I’ll now talk about its architecture, core concepts, rendering, layout schema, and more.
Deciphering Flutter Architectural Layers
A layered architecture represents a pattern for building digital solutions like applications, software, etc., to improve its maintainability, testability, and modularity.
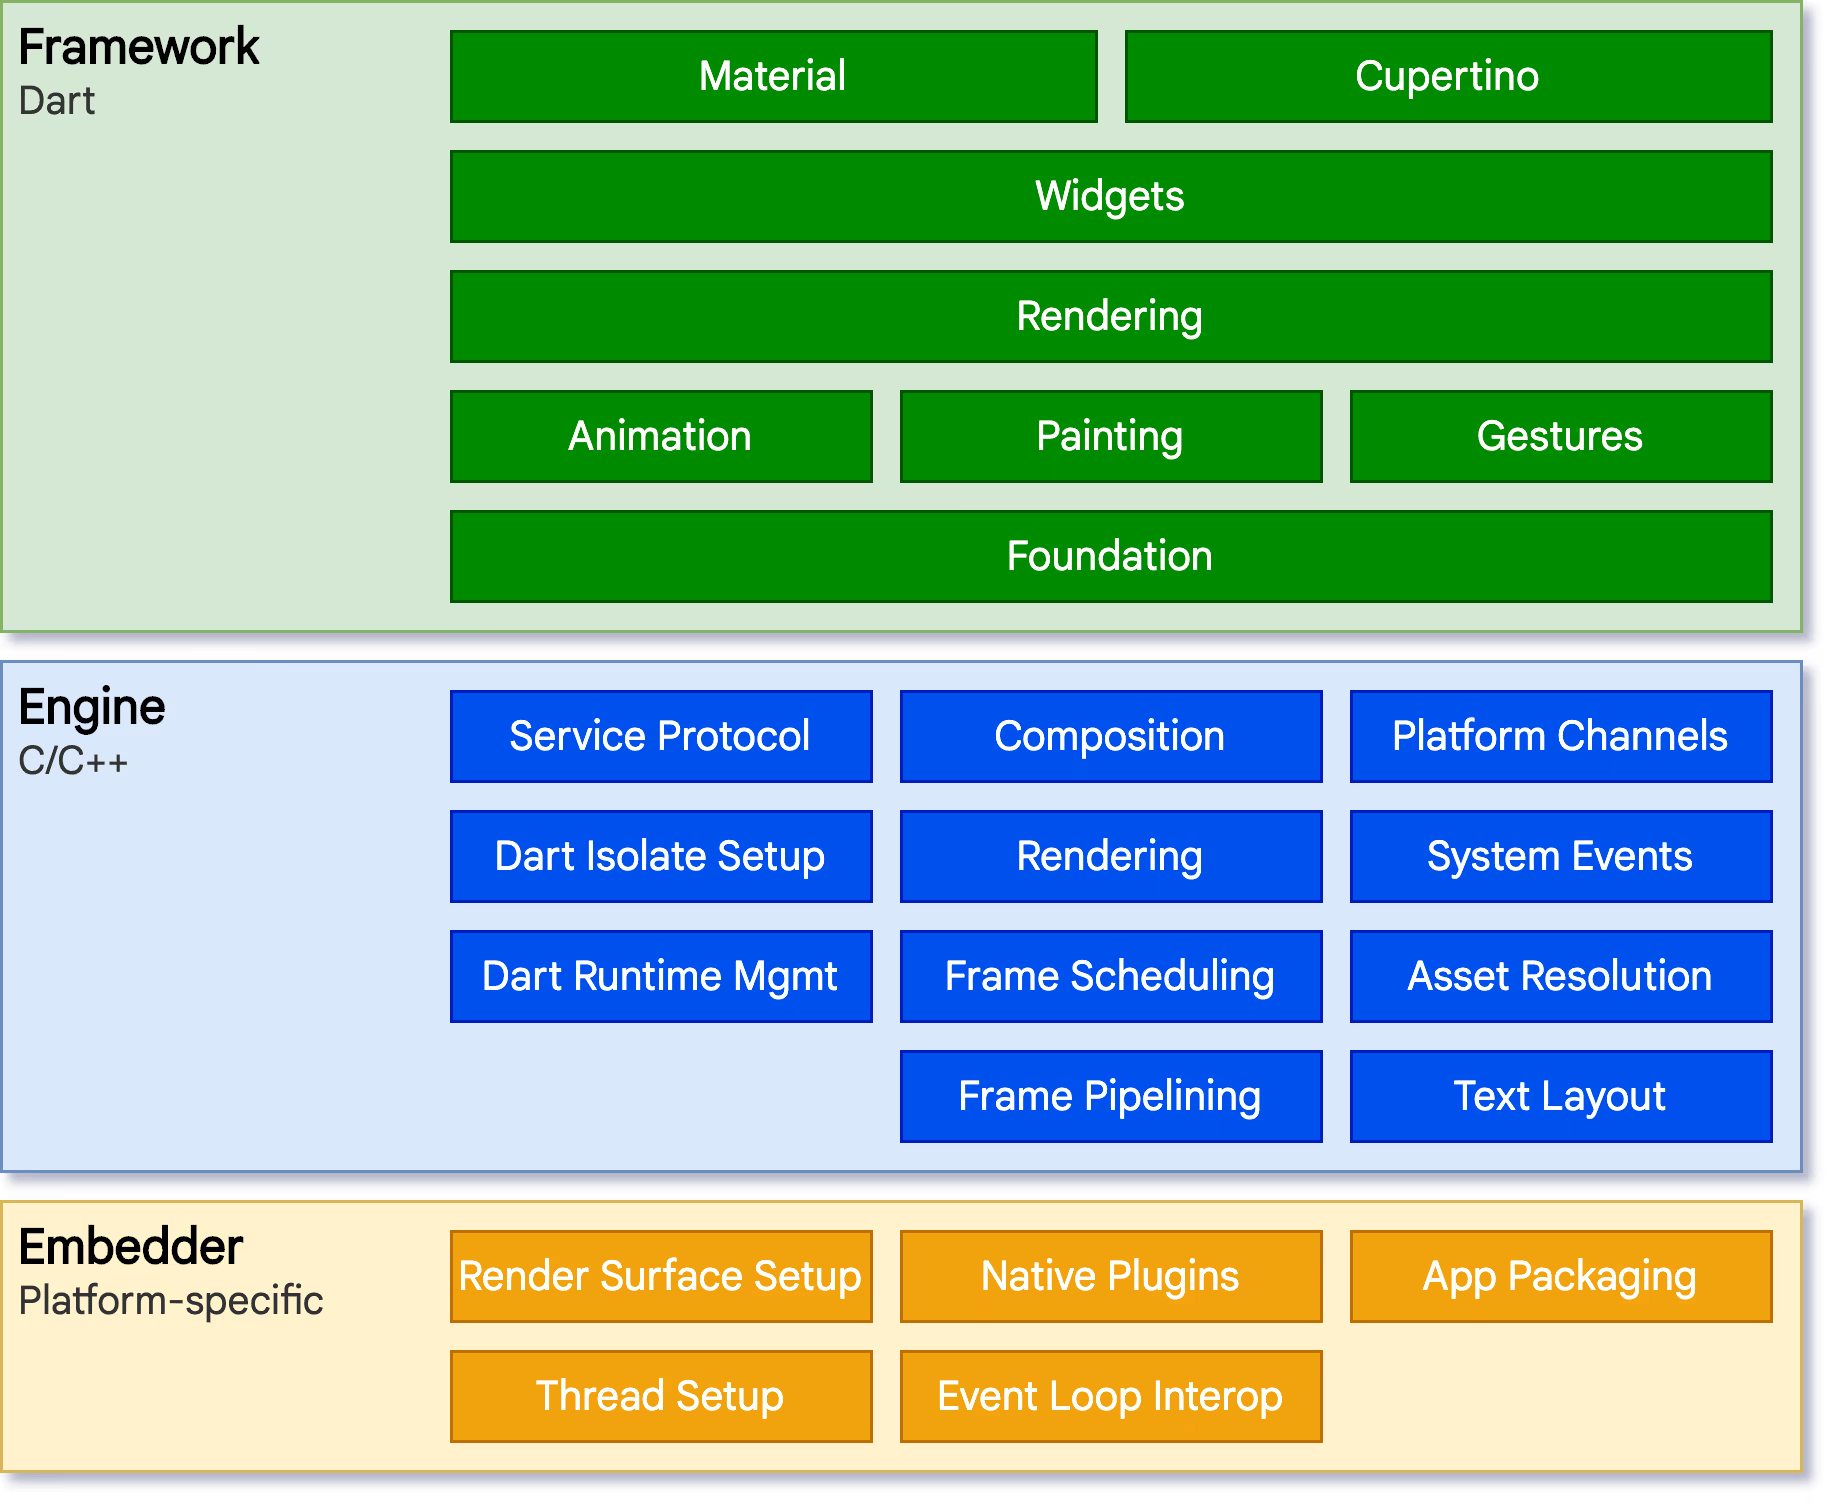
Working with an understanding of a layered development architecture is important for the following reasons;
- Separation of Concerns: Effective layering divides the app into distinct components where each one has specific responsibilities. This makes the code you write easier to understand and maintain.
- Better Flexibility and Scalability: Although these layers are combined, they are loosely coupled. Hence, this makes modifying and scaling each layer independently for a smooth adaptation.
- Reusability: Layering augments code reusability, allowing the components you build to be reused in separate applications.
- Testability: Due to the separation of concerns, it’s easier to test each layer in isolation. You can test the business logic behind the application without setting up a database connection. Such connections are made easier with a layered architecture.
This image represents the Flutter architectural layering. If you have some experience in native application development, you will notice that a Flutter application layering is similar to a native app’s architecture.
-
Embedder
Embedder is the entry point, and it also coordinates with the operating system you are using for development services, including;
-
- Rendering
- Accessibility
- Input
Hence, the Embedder works like a middleman, ensuring your Flutter application can access device features to run the screens and show app elements to the users.
The coding for the components in this layer is platform-specific. This means that for Android apps, you must use Java or C++, and for iOS or macOS, you must use Objective C. Each device speaks a different language. The apps are built with a universal platform like Flutter; the Embedder will translate Futter’s language into platform-specific language.
According to this Flutter app structure, the embedder helps run things smoothly by establishing communication between the application and the device.
-
Engine
The Engine is often termed as the powerhouse of a Flutter app development and it is written in C or C++. Here’s what the Engine does;
-
- Give Instructions to Device: The Engine understands the application design and translates it to instructions the user’s device can comprehend.
- Provide Building Blocks: It’s the engine that forms the required building blocks for your app’s core functionalities. For instance, it will help in displaying text, facilitate user interaction, and ensure smooth operability with the app files.
- Ensure Accessibility and Functionality: Its the Engine’s responsibility to ensure the application is accessible to the users. Moreover, to improve the app’s functionality, the engine allows adding extra features via plugins. These are the additional features that can use the device’s camera and location services.
This implies that the Engine provides a low-level implementation system to Flutter’s Core API to include things like graphics, text layout, files, network I/O, etc.
The components of Engine in Flutter can also be written in Dart, but with a bridge (dart:ui) that works as a translator to convert complex C++ code into a Dart-friendly format. So, this bridge makes it easier for developers to use a simpler language, Dart to write complex functionalities for C++. The dart:ui bridge also opens up the Flutter engine to its framework architecture layer.
-
Framework
This is the part of the architecture where you will spend most of your time on Flutter app development. The reason being this is the layer where you will build the app’s UI and logic.
-
- Foundational Classes: These classes represent the building blocks of the app’s UI and include animations, painting, and gestures. As you lay the foundational bricks, the application starts to get a raw shape, which is improved with rendering.
- Rendering in Flutter: It’s akin to arranging the app’s pieces in a desired layout and order, personifying the hierarchy of objects and visual elements. Through the rendering layer process, you can change the elements and their layout to reflect the required changes in the app’s design and UI.
- Widgets: Widgets play a crucial role in app development and help build its UI. Developers are smart to consider each visual element in the app design as a widget and then combine all the widgets to create a complex and functional UI. Following this approach, you can also reuse the widgets facilitating reactive programming.
- Material and Cupertino: These are two different pre-built widgets used for app designing based on specific design guidelines. Material follows Google’s design language and Cupertino does the same, but with Apple iOS design language. Developers use them to extract ready-to-use components for common UI elements.
While we are on the Flutter architectural layers topic, I want to share another unique thing about this framework. The Flutter app development framework has a small size, which may pose challenges for developing high-level complex features.
However the smart team behind this framework found a way to allow developers to implement these features as packages. Because we can do this, simpler features like camera, web view, animations, etc., can also be implemented as packages.
Flutter Core Concepts and Widgets
Flutter app widgets help developers build beautiful, performant, and robust applications. This collection of visual, structural, and interactive widgets is used in almost every aspect of developing an application with Flutter.
Widgets are an essential part of Flutter app development and there are a few key principles I want to share before listing the widget names.
- Composition: It’s a form of a Flutter widget with a special purpose to help create complex UIs. Developers will agree with me when I say that creating an application is not an easy process, and complex UI structures further complicate everything.
This is where a Composition widget comes in, as it helps combine simple widgets so that you can create complex UIs easily.
- Widget State: This refers to the mutable data which tends to change over a period of time. So, imagine reading some information about a widget when it is built and expect it to change during its lifecycle. The information of this widget is stored in a State object connected to the widget.
- Stateless Widgets: These widgets don’t have any mutable data or state that requires tracking. In other words, these are the widgets that do not depend on any other component except the configuration information supplied at the time of development. Remember that these widgets won’t change once created and are often used for application components that don’t require dynamic changes.
While we are on the topic of immutability, let me also introduce Freezed, which is a package developers can use to generate immutable data classes in Dart. Using this package, you can be sure of data integrity flowing through the data class and of simplified data management.
I am listing down the most used and important widgets Flutter developers use for mobile app development with Flutter, segregated according to their category.
Foundational Widgets
| Widget | Description |
| MaterialApp | Based on Material Design, it’s a convenience widget that wraps different widgets collectively required for application development with the purpose of defining the overall app. |
| Scaffold | Helps lay down the basic Material Design visual layout with a toolbar, body, and navigation elements. It is generally used to get APIs for showing drawers, snack bars, and bottom sheets. |
| Container | Represents the workshop to build application layout housing other widgets and define their dimensions. |
| SizedBox | This is a spacer widget, which notifies the specific amount of space required in creating gaps and fixed-sized elements. |
| Divider | Use it to add a thin line within the different sections of the UI to improve organization. |
| Padding | Use it to add space around an application component and create desired margins in other elements. |
| ColoredBox | An easy-to-use widget for filling color in the empty spaces and creating beautiful backgrounds. |
Navigation Widgets
| Widget | Description |
| AppBar | A container widget is used when you want to display content and actions on the top of the application screen. |
| Bottom Navigation Bar | A container widget that has the tools to explore and switch between the app’s top-level view in one click. |
| BottomSheet | This widget is used when you want to add elements that pop up from the bottom of the screen. |
| Navigator Routes | A navigator object in the form of a widget allows users to switch between different application screens. |
Asset Widgets
| Widget | Description |
| Image Providers | Use this widget when you want to specify the display settings of an image in the application. You can use different types of Image Providers like AssetImage and NetworkImage. |
Layout Widgets
| Widget | Description |
| Row | This widget is used to define the layout of a list of different child widgets and place them in a symmetrical direction. |
| Column | Opposed to the Row widget, it helps create the layout of elements in a vertical direction. |
| Stack | A class widget is used to overlap several widgets on top of one another and successfully create complex layouts without causing any confusion. |
Scrolling Widgets
| Widget | Description |
| ListView | Use this widget to build a linear list of widgets and structure them to display one after the other in the scroll direction. |
| GridView | Represents the grid list in repeated cells arranged in both vertical and horizontal directions. |
Interactive Widgets
| Widget | Description |
| Icons | A widget to select icons for the application from the Material Design library. |
| IconButton | These are commonly used clickable icon buttons that lead users to take supplementary action or opt for an action. |
| ElevatedButton | Another Material Design based widget that lets you add elements that pop up or elevate when pressed. |
| TextButton | Used to add Material Design simple flat button without any border and outlines. |
Animation Widgets
| Widget | Description |
| Hero | Used to create smooth and seamless animations in a Flutter app, this widget is specifically used when you want to create flawless transition animations between two screens. |
| Animated Container | An amazing Flutter app widget, it is used to animate changes in application properties like variations in height, color border-radius, etc. |
| Animation Controller | It’s a powerful tool to create explicit animations in applications built on Flutter and have granular control over the animation process. |
Form Widgets
| Widget | Description |
| TextField | Use this widget when you want to add a box for the app users to enter text. Usually, these are used in forms, dialogs, and search columns. |
| Text Editing Controller | It’s a controller widget with an editable text field and can be used to manage the app’s TextField and TextFormField widget to update the values of the field. |
All these widgets in Flutter are used according to the development requirements. While these are the most frequently used, here are a few other widgets that may need during development;
- Align
- AppBar
- Autocomplete
- Badge
- Checkbox
- Clip
- Cupertino
- And many more…
Widgets are the tools you need in your app development process to create beautiful applications with smooth visuals and strong structural foundations. A wide array of widgets are used in an application development process and the widgets interact with each other during app operations.
State Management in Flutter
State management in Flutter spearheads data management; your application will render and identify its reaction to the user’s input; in other words, it tracks the changes to the widget and component state for updating the app UI, user interactions, and data changes according to changes required.
Importance of State Management in Flutter
- Centralizing Data Management: As state management is one of Flutter app’s core concepts, it works at the central level and allows for data consistency across the app screens and widgets.
- UI Updates: With this, you can be assured of UI updates, check unwanted reworks, and build new widgets from scratch. Following this, you can achieve better work productivity and deliver the app faster.
- Easy to Scale: Effective implementation of state management practices facilitates scalability through a structured and development-centric approach and by managing complex data flows.
While we are on this topic, let me clear the air around the difference between state and stateful state management.
- The state represents the data in a widget that you create or extract and which can be read when you are building the widget. This state can change during the widget’s lifetime.
- Stateful state management personifies a pattern you can detect and identify to handle the state of widgets across the application. This includes managing their state and managing the dynamic changes while updating the UI.
Effective state management is achieved by implementing different solutions, which are;
- Provider-Based: Here, providers hold the application state through a centrally managed system. Widgets can access the application state and extract data with dependency injection.
This form of state management is beneficial because;
-
- It’s easy to learn and setup
- The application will have reactive UI updates that automatically rebuild, but only when the state within the provider changes.
- The provider technique offers impressive scalability when you can nest all providers, resulting in more modular and organized state management.
One of the examples of this technique is Riverpod state management and it has several advantageous features. We will discuss more about this ahead.
- Business Logic Component (BLoC): This state management technique handles events like user interactions with the application, network requests, etc. Plus, they transform these events into states and update the UI accessible by the end-user.
To make management easier, the BLoC follows a unidirectional data flow approach, which improves;
-
- Predictability which grants a clear separation of concerns between the app’s events, states, and UI logic.
- Testability, which streamlines Flutter unit testing of BLoC components, even in isolation.
- Scalability, which is effective in building and deploying applications with a complex UI and multiple data sources.
- Getx: This state management model is used to manage the state of widgets, leading to automatic UI updates in accordance with data changes. Along with this, the Getx approach also offers dependency injection and routing within the application.
State Lifecycle
All of the Flutter app widgets have a lifecycle similar to an application lifecycle. However, the difference here is in the number of stages;
- Creation: Using the createstate() function, developers first create the widget, followed by the creation of the associated State object.
Some developers can consider the second stage of Initiation as a part of creation and call the initState function to insert the widget in question into the widget tree. With this, you can complete tasks like;
-
- Allocating default values to the state variables.
- Set up listeners for state events like user interaction, network calls, etc., to trigger updates in the state.
- Asynchronous operations to manage the widget’s state.
- Updates in the State: The second stage in this process includes functions like didChangeDependences and setState. These functions are used after the initiation stage and facilitate changes in the state depending on;
-
- How do users interact with the widget?
- How do data changes occur at the time of receiving it from external sources?
- How does internal logic in a widget modify the state?
Here’s a short overview of the two functions used in this stage;
-
- didChangeDependencies: It’s written when the dependency on a widget changes.
- setState: A primary method used to trigger state updates and notify the new framework of the changes in the state object.
- Disposal: This state lifecycle stage is when there is no use of the widget and it has to be removed from the widget tree. Use these two functions;
-
- Deactivate: Use this before removing the widget while performing cleanup tasks.
- Dispose: Use this after removing the widget from the tree, and it is used for internal cleanup tasks
Riverpod State Management
Riverpod is used for reactive state management and within the dependency injection framework. As a result, in case of data changes in a variable, the UI will rebuild automatically.
Using the Riverpod state management technique becomes essential in the following situations;
- To identify and catch errors in programming, especially the compile time rather than run time.
- To extract, catch, and update from a remote source.
- When developers want to auto dispose of the state of providers when they are not used.
Riverpod state management is an important part of Flutter app development, and to talk about everything in this, I will need to write a separate article. For now, let’s stick to the most important aspect I want to share.
Methods in Riverpod state management to interact with providers
- read(): It’s required to get the value of the provider and is used in functions like initState, onPressed, etc.
- Watch(): Use this method to know the value of a provider, initially and every time it changes due to any reason. Preferably use this method inside the build method.
- Listen(): Use it to simply listen when the state in a provider changes for executing a specific function or event.
Flutter Rendering and Layout Schema
Widgets are an inseparable part of Flutter, and they are used extensively in this cross-platform app development framework. The widgets are used as classes to build UI for layout, and simple widgets are used to build complex widgets.
This brings me to the layout schema of Flutter that will help you get a better sense of how a Flutter application is built and implemented.
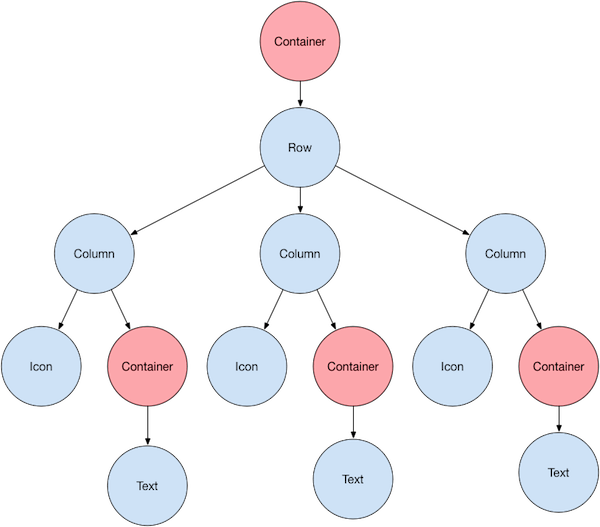
This image represents a Futter tree, which personifies the layout developers use to combine widgets and create a hierarchical structure.
Flutter Tree
Imagine a tree with all its branches and leaves, where each element represents a widget or a group of widgets. This tree, while invisible, brings the app’s UI to life. Here are the components of a tree;
- Root Node (Container): All Flutter trees have a single root node containing a Container widget. This widget sets the foundation for all the UI elements in your application.
- Column, Row, Text: These are the widgets used for application UI design. The image above is just an example; don’t consider your app’s tree to have only these limited widgets. However, in the image example above, you can see Text widget is connected to the Container widget, required to add margins.
Container is a parent widget that controls the layout and the behavior of the child widgets. This sort of widget nesting you see in the image is a simple example. During development, you will end up creating a much bigger and complex Flutter tree.
Flutter Layout Widgets
Creating a Flutter widget hierarchy may seem a complex task, but it won’t be when you are using Flutter layout widgets. Use one or more layout templates, choosing from Single-Child layout widgets, Multi-child layout widgets, and Layout helpers.
Your choice of a layout widget depends on the way you want to align or constrain the visible widgets. A beginner Flutter developer will need some time to navigate through setting these widgets in the right order to get the desired result.
Flutter Rendering Model
It’s rare for any sort of application to have a single widget. Since applications have multiple widgets nested into complex layouts, rendering is a necessary part of the development exercise.
For a rendering model to work efficiently, the UI framework should be able to determine the size and position of each element before rendering.
A cross-platform framework’s rendering model is different from a native application. So to understand cross-platform app rendering, let me refresh your memory on a native app rendering model.
Where native application code rendering uses a Canvas object and renders it with Skia to call CPU or GPU to complete the drawing, cross-platform applications create an abstraction layer.
Using the abstractions, the framework creates a bridge between interpreted languages and the native UI libraries where the app will run. However, these abstractions prove inefficient with frequent update requirements.
Working with Flutter, this overhead is eliminated through the framework’s high-performance widget set. Now that you know rendering with Flutter is better let’s see how it works.
- Compiling Dart Code: Flutter apps are built using Dart. What happens with other apps is that they require runtime translation for compiling the code. But with Dart, Flutter compiles the code directly into native code (ARM x86) for the target platform.
Once compiled, the code will interact with the Flutter engine. Do you know what this means? Well, for one, you won’t need any intermediate translation layers, leading to a faster process execution and smoother UI rendering.
- Using Skia for Higher Performance: Flutter uses Skia, a graphics library, to render UI elements. With Skia integrated into your Flutter development environment, harness functionalities like;
-
- Anti-aliasing
- Text rendering
- Path manipulation
- Blending
- UI elements compositing
Ultimately, using Skia with Flutter, you can expect to render a consistent and appealing UI.
Well, that’s not all. Flutter has its copy of Skia embedded into the engine. This means that even if the user has not updated their device to the latest OS version, developers can upgrade the application and implement the latest performance improvements.
Based on this, I can confidently claim that Flutter’s rendering engine and working model facilitate better efficiency, better control and consistency. To take this discussion forward, I want to share two images to better explain the Flutter layout and rendering process.
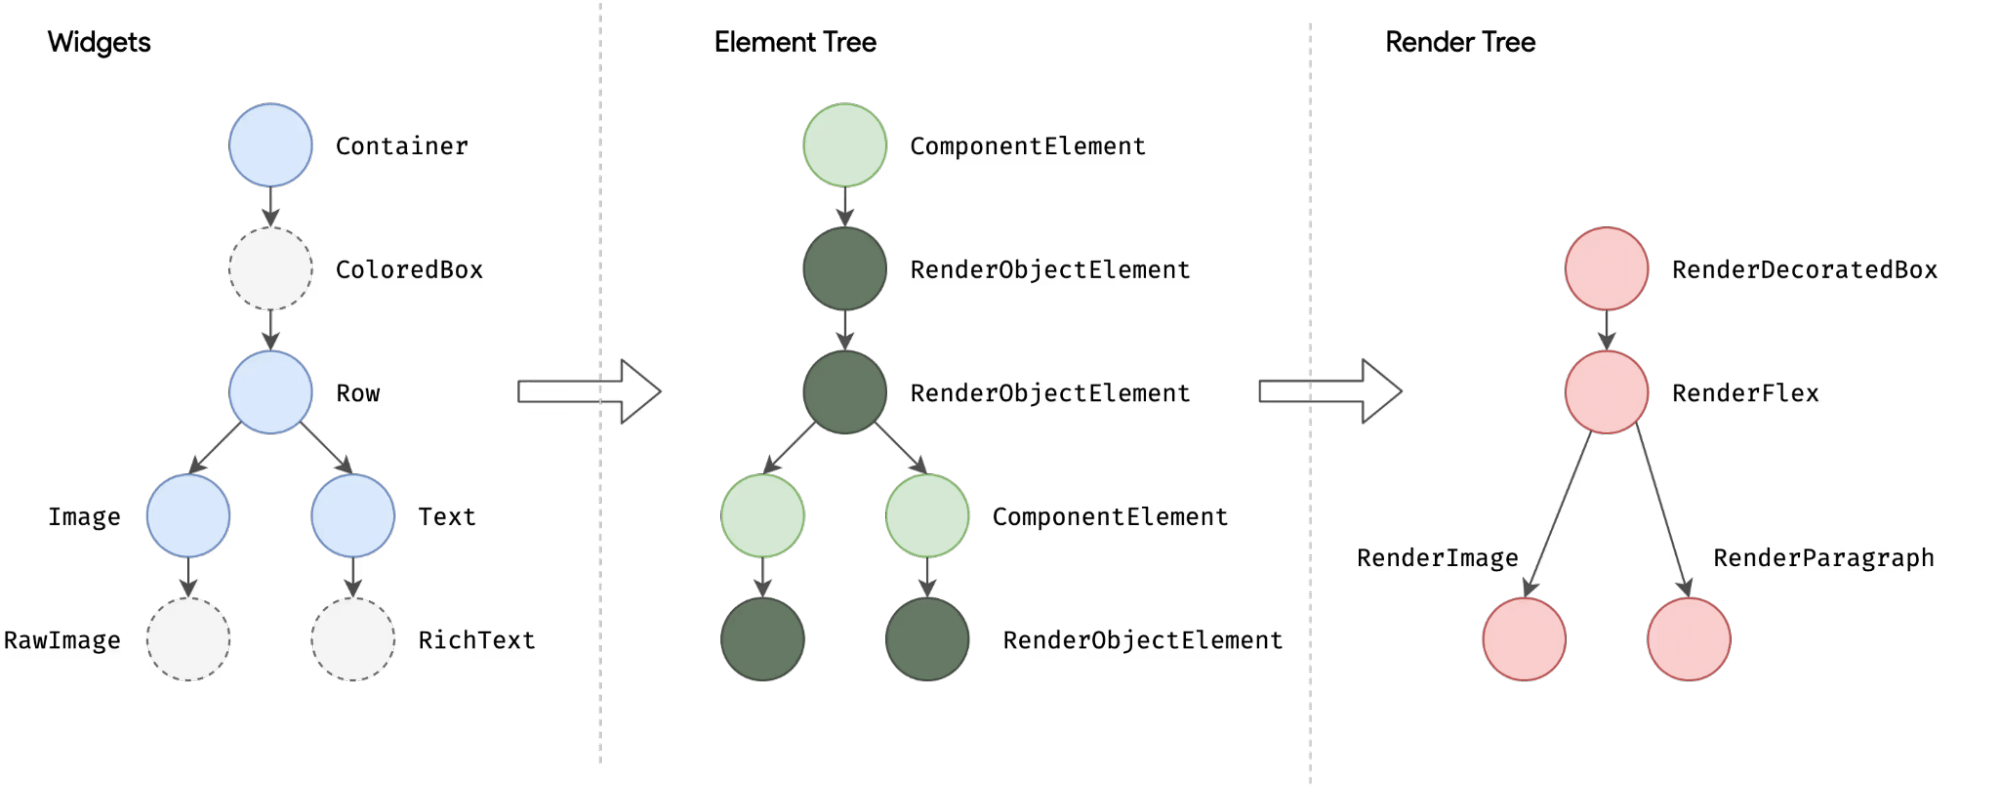
In the context of the image above, we have already discussed the diagram in the first one. Furthermore, it depicts a simplified version of the widget tree, and it describes the structure and appearance of the application’s UI.
As a result, every widget and its properties define a specific UI element, like a button, image, text block, etc. Moving on, the layout of the element tree dictates how the child widgets are arranged on the app’s screen. Moving on to the Render tree, here are the widget tree descriptions into pixels for the application’s screen using Skia.
Using this approach, the Flutter rendering pipeline moves forward by inhabiting a principle, simple is fast. Hence, the pipeline Flutter uses is pretty straightforward, as you can see in the image below.
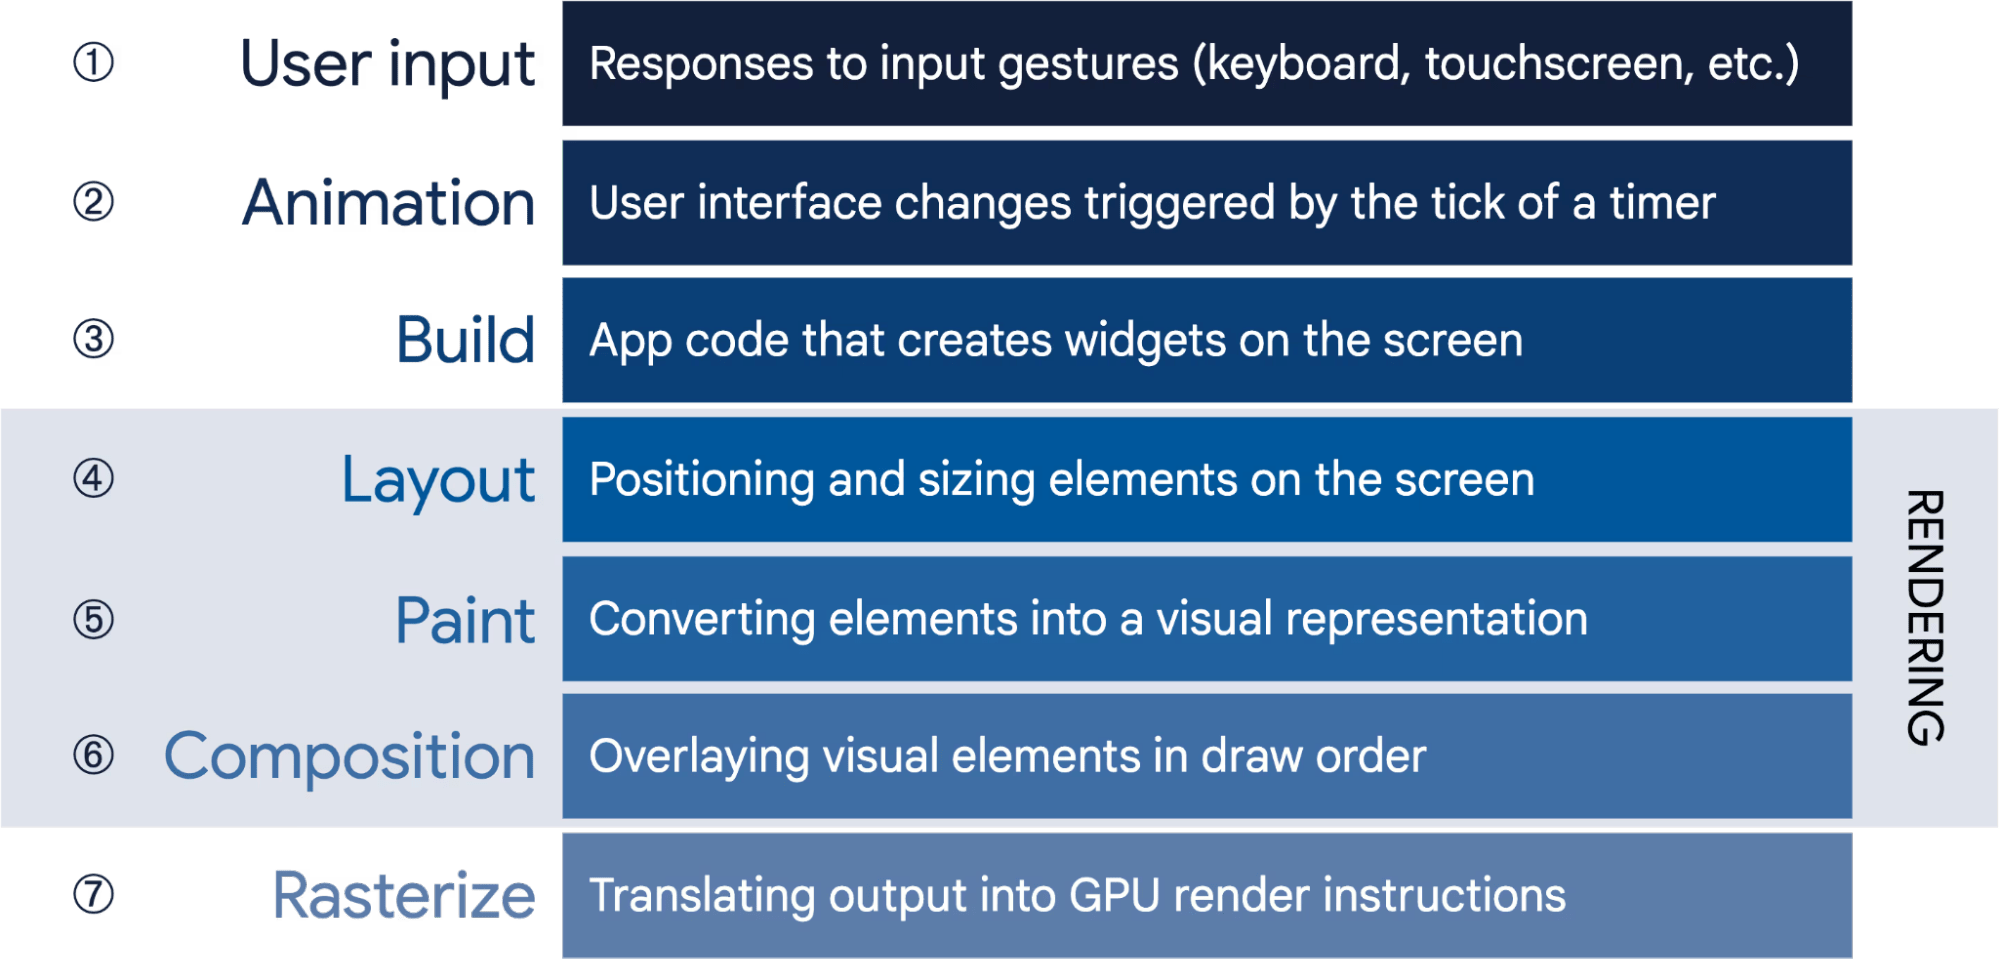
- The process begins with the User Input, showing how an end-user interacts with the application. They use gestures, taps, swipes, etc., to engage with the application.
- The user input leads to spawning Animations visible to the end user moving forward to Build, which represents the code that has created the widget now used in the process.
- Layout is the next step in the rendering process, which shows the widget’s position and size of the screen.
- In the next step, Paint the widgets undergo stylistic conversion to improve the visual representation of the elements on the end-user’s screen.
- With the visual changes complete, the process moves to Composition, wherein the converted elements are layered on top of each other, following the principles of the Flutter widget hierarchy.
- The last step is Rasterize, which includes the process of translating the output users get into instructions the device’s GPU can fathom.
The culmination of this process is when all the stages come together to build a final image that will appear on the device screen with an impressive dance of widget hierarchy and Flutter UI. In the end, widgets are rendered on the screen because everything on Flutter is ultimately a widget.
Making Projects with Flutter
To start making projects with Flutter, familiarize yourself with the project structure;
- lib/ – In Flutter, all the code you write for a project is saved in this file.
- Pubspec.yml – This file stores a list of packages you will need to run the application. However, note that you cannot use the package management directly. For this, you have to use flutter pub get <packahe_name> to extract the package files.
- test/ – This is to test the Flutter applications.
- ios/ & android/ – It’s a code-specific command used for respective platforms to finalize settings, icons, etc. and also set permissions for the application.
Until now, all that we have learned comes to this: building your first Flutter application. While I cannot write the complete codescript here, let me share some lines to give you an idea to help you understand how to start coding with Flutter.
| import ‘package:flutter/material.dart’;
void main() => runApp(MyApp()); class MyApp extends StatefulWidget { @override _MyAppState createState() => _MyAppState(); } class _MyAppState extends State<MyApp> { int _counter = 0; void _incrementCounter() { setState(() { _counter++; }); } @override Widget build(BuildContext context) { return MaterialApp( home: Scaffold( appBar: AppBar( title: Text(‘Flutter Counter’), ), body: Center( child: Column( mainAxisAlignment: MainAxisAlignment.center, children: <Widget>[ Text( ‘$_counter’, style: Theme.of(context).textTheme.headline4, ), SizedBox(height: 20), ElevatedButton( onPressed: _incrementCounter, child: Text(‘Increment’), ), ], ), ), ), ); } } |
In the code above, we have one component and a few widgets working amicably within the Flutter project structure;
- MaterialApp: A component we use to wrap widget hierarchy.
- Scaffold: Used to provide the basic layout of the app structure.
- AppBar: Adds the app bar at the top of the screen, sharing the app’s title and CTAs.
- Text: A common widget used to add and display text.
- Center: Used to position the child widget at the center of the space on the screen.
- Column: Used to arrange the child widgets vertically.
- SizedBox: This widget, when inserted will allow you to add a fixed amount of space between different child widgets.
- Elevated Button: Use this one to add a clickable button on the screen with a raised effect.
If you would notice in the code that, there’s a Text (within ElevatedButton) widget, which shows how a nested system is used to club widgets.
The entire code script you write for a Flutter application will have the names of different widgets and components clubbed together systematically to deliver a visually appealing and performance solution.
Still, I want to mention using some advanced Flutter features for app development.
Advanced Features in Flutter Development
- Navigation: Flutter has a solid navigation system you can utilize to manage screen transitions in the application using the following concepts;
- Navigator: A pivotal component that lets you manage and control the navigation stack. Using this, you can add new screens, switch back and forth between them, and replace the current screens with other objects.
- Routes: This defines the configuration of each screen in the application, along with the widgets and transition steps.
- Navigation Patterns: In cross-platform app development with Flutter, you can use various patterns for application flow structuring;
-
-
- Stack Navigation
- Tab Navigation
- Bottom Sheet Navigation
-
- Animations: They are used to enhance the app’s interactivity and increase user experience with smooth transitions. You can use the following ways to add animations;
- Implicit Animation: Use Flutter’s built-in animations for subtle changes in a widget.
- Explicit Animation: With the AnimationController class, you can get better control to define custom animations and change the widget properties in real time.
- Animation Packages: For even more complex animations, you can integrate pre-built animation packages like rive and flutter_animator.
- API and Network Calls: With Flutter, we use the HTTP or dio package to add APIs, allowing them to communicate with the database and application features. For this purpose, the commands used include;
- HTTP Clients: Http or dio libraries have several HTTP requests, adding convenience to call API requests.
- Fetch Data: The same HTTP clients are used to extract data from APIs present in JSON or other formats. A better way to implement the extracted data is to parse the response and set updates for the app’s state.
- Send Data: You can also use HTTP requests to send data to different servers using POST requests.
- Flutter_intl: Localization: This command in Flutter will make your application accessible to a global audience through localization. Basically, it will enable your application to be accessible in different countries and display content in multiple languages.
It’s not only about translating the app’s content, but it’s more about delivering an intuitive user experience based on the user’s culture and region. Implement localization in the following ways;
-
- Intl Widget: This widget is required to display localized text or content in the application’s UI while adapting to the user’s device language settings.
// Add Flutter Intl to your Flutter project dependencies:
flutter:
sdk: flutter
flutter_localizations:
sdk: flutter
flutter_intl: ^0.18.1
- Intl Widget: This widget is required to display localized text or content in the application’s UI while adapting to the user’s device language settings.
-
- Message Catalogs: With YAML files, you can organize the translation-ready strings into message catalogs.
// Configure the YAML file for localization flutter_intl:
enabled: true
localizations_delegate_class: AppLocalizationsDelegate
path: lib/l10n
default_locale: en
locales:
– en
– es
– fr
- Message Catalogs: With YAML files, you can organize the translation-ready strings into message catalogs.
-
- Localization Delegate: To load the messages users receive according to their device’s location, use the IntlDelegate command.
- Hive/sqlite Storage: Another one of the important Flutter app development tools, hive/sqlite storage is used to store user data locally on the device. Here, you have two options;
- Hive: This one is a lightweight NoSQL database effective for saving structured data, including user preferences and cached information. With this, you can also provide offline persistence and efficient data manipulation to the application.
- Sqlite: This one’s a mature relational database version with the capability to handle complex storage management situations, this one also required sophisticated querying. An in-depth understanding of data structures used with sqflite package will help you connect this database with the application.
- Svg images/icons: Identifying the changes in existing image formats, app developers use Scalable Vector Graphics (SVG). And here’s why;
- Scalability: You can resize these images without reducing its quality. Hence, it’s ideal for adding varied image sizes for different screen resolutions.
- Flexibility: While maintaining image quality, SVGs can also dynamically change colors while writing the Flutter code.
Features of Working with Flutter
Flutter app development features offer an exciting way to build performant features. These features enhance the benefits of Flutter app development and create a smooth platform for the developers to build applications.
-
Hot Reload
A distinctive Flutter feature, hot reload, means that developers can see updates instantly during development. As a result, you won’t have to reload the screen time and again to check the updated version.
Not only does this increase the development time, it gives you more room to experiment, innovate, and iterate while refining the UI to get what you need.
-
Single Codebase
Since Flutter is a cross-platform technology, you need to write the code once and deploy it on different platforms. Since you can write the codebase once for Android, iOS, Web, and desktop software, it significantly reduces the development time.
-
Expressive Flutter UI
With Flutter, designers and developers will receive a wide range of rich but customizable widgets. With these, you can build aesthetically appealing user interfaces.
Moreover, these widgets ensure the UI adapts to the screen size and form factors. Hence, the UI provides a consistent look and feel across different platforms.
-
Accessibility to Native Features
With Flutter, developers get direct access to the device features, functions, and APIs. These are their target devices, which can be numerous, depending on the project requirements.
This means Flutter developers can smartly build solutions around the device’s sensors, cameras, geolocation, etc. and build platform specific features. This ensures the solutions you build are fine-tuned to provide the best possible performance.
-
Quick UI Coding
Flutter excels at UI coding because of two components we have already discussed above;
-
- Declarative UI
- Stateful Hot Reload
It’s not like you have to integrate them or somehow use a special code script to implement them. These are in-built properties of Flutter and can be used to build applications quickly with ready-to-use UI coding.
-
Code Reusability
Flutter has a single codebase, which we have already discussed above. Code reusability stems from this single codebase, as you only need to write the code once and deploy it across different platforms.
Hence, you won’t need to write the code for all the platforms separately, which effectively saves time and effort. Along with this, developers working with Flutter can use widgets as reusable components.
These pre-built widgets are replaced for common UI elements in all sorts of applications, just like you would do in a drag-and-drop scenario. Since they are also customizable, you can edit them accordingly.
-
Object Oriented Programming
Flutter uses an OOP approach. While it’s a part of Flutter architecture, it’s also a feature. In OOP, coding is done based on classes and objects giving way to modularity and code organization.
Classes personify the object’s structure, data and functionality, through which it helps write clear and more maintainable code.
-
Gesture Detector
Gesture detection in Flutter allows your users to interact with the application through different touch gestures. This includes taps, swipes, drags, etc. and the work of detectors is to translate these into the application code and functionality.
Gesture detectors help create intuitive and user-friendly applications, paving the way for an enhanced user experience.
Benefits of Flutter for Different Roles
Flutter is an open-source and cross-platform app development framework, which has proven beneficial for multiple sorts of developers and other frameworks. Here are the key roles that have benefitted from working with or having an understanding of Flutter;
-
Android Developers
As an Android developer, your knowledge and skills are highly valuable and useful when working with Flutter. This is because Flutter is already dependent on the mobile device’s capabilities and settings.
So working with Flutter, you will learn new ways to build UIs for an Android mobile application. The best part is that you will only need a few hours of learning to become a Flutter expert.
Concepts on Android It’s Equivalent in Flutter
View Widget Activity Flutter uses Screens/Routes within a single Activity Fragment Flutter uses a composition of Widgets Layout Widget Tree and Layout Properties Drawable Image Widget or custom-painted Widget Button ElevatedButton, TextButton, IconButton, etc. (depending on style) TextView Text Widget EditText TextField Widget ListView ListView Widget or custom ScrollView with ListAdapter Recycler View Similar to ListView, can be built with custom ScrollView and SliverList Intent (for Navigation) Navigator and Routes Shared Preferences SharedPreferences package SQLite sqflite package
-
ReactNative Developers
ReactNative developers can also use their existing knowledge and fundamentals to get started with Flutter. React Native is based on JavaScript and Flutter on Dart. So, a React Native developer must first identify the common things between these two programming languages.
-
- React Native and Flutter use reactive-style views/widgets. This implies that where React Native compiles the code to the platform-based widgets, Flutter compiles it to the native code.
- Both frameworks have a declarative UI and also offer hot reload functionality.
While there are some similarities, React Native developers are set to face some challenges when working with Flutter. Here are the two major ones;
-
- UI Rendering: Flutter uses Skia, its own rendering engine, which very impressively grants better control over the output and ensures better performance.
React Native, on the other hand, depends on the native platform’s UI components for a native application look and feel. But this hinders the app’s performance.
-
- State Management: In Flutter, developers use widgets to manage state, but React Native uses Redux or Mobx, both of which are external libraries. Hence for state management in Flutter, React Native developers shall take some time to adapt to the former’s method of working.
-
Web Developers
Web developers are familiar with HTML and CSS coding syntax to build applications. So, web developers must learn to map the HTML/CSS code they write into their Flutter or Dart equivalents.
Developers unknown of how to use JavaScript must first learn the language and then learn Dart as a JavaScript expert. The constraints in creating a web layout or design is completely different from how it’s done on Flutter. Hence, the learning automatically grows in size and scale.
-
Xamarin.Forms Developers
Good thing for Xamarin.Forms developers that they can use their existing understanding of the framework to build applications on Flutter. Here too, Xamarin.Forms and Flutter are similar in that they offer declarative UI and hot reload.
But the differences are pivotal to know and address;
-
- Platform Support: With Flutter, you can easily build applications for Android and iOS platforms, but Xamarin.Forms goes one step ahead in broadening the scope. Here, you can also build solutions for UWP, Windows, macOS, and web.
- UI Rendering: Xamarin.Forms use the native platform’s UI to render the components to their desired form. But Flutter uses Skia. This causes a significant difference in performance with Flutter taking more points.
- State Management: With Flutter, you use widgets for state management. But with Xamarin.Forms, you have more flexibility through the Model-View-ViewModel (MVVM) architecture.
Mobmaxime, The Best Flutter App Development Company
I admire business owners and professionals who want to learn to code from scratch and use their favorite technology to build solutions. It’s a valuable skill that is relevant for the years to come.
However, it’s not easy for anyone, even if you are an existing developer with expertise in other frameworks or a business owner with zero to some coding knowledge to build with Flutter.
While you may have time to work on a solution on your own, I would recommend you hire the top Flutter app development company for the task. At Mobmaxime, we provide the best Flutter app development services in the industry and lead the pack with an excellent solution.
Our team of Flutter developers has the prowess and thought process your business needs to entertain your users with an excellent solution for their requirements.
Want to know more? Connect with our Flutter team and take this discussion forward.
Join 10,000 subscribers!
Join Our subscriber’s list and trends, especially on mobile apps development.I hereby agree to receive newsletters from Mobmaxime and acknowledge company's Privacy Policy.
